Forward Proxy
The Forward Proxy feature allows you to route traffic from your applications and systems through Beeceptor for traffic interception, inspection, and mocking. This powerful capability enables you to intercept both HTTP and HTTPS requests from any configured client and manage mock responses directly from the Beeceptor dashboard.
The Forward Proxy feature is available on Scale and Enterprise plans only.
How It Works
Beeceptor Forward Proxy operates as an HTTP proxy that supports both HTTP and HTTPS traffic.
For HTTPS requests:
- The client sends a
CONNECTrequest to the proxy. - Beeceptor establishes a secure connection.
- Traffic is decrypted and inspected.
- The request is either forwarded upstream or matched with a mock rule.
Because HTTPS traffic is decrypted for inspection, you must install and trust the Beeceptor Proxy CA certificate on the client device.
Getting Started
You need two things before routing traffic:
- A proxy authentication password
- The Beeceptor Proxy CA certificate
Step 1: Configure the Proxy Password
The first step is to configure the authentication password for your forward proxy in the endpoint settings. Each endpoint has its own forward proxy credentials.
- Open your endpoint.
- Go to Settings.
- Scroll to Forward Proxy Configuration.
- Click Set Password.
- Save the generated password securely.
The password is shown only once. If lost, you should reset it. This will be used as the authentication credential when configuring any client (browser, terminal, or system) is instructed to use the forward proxy.
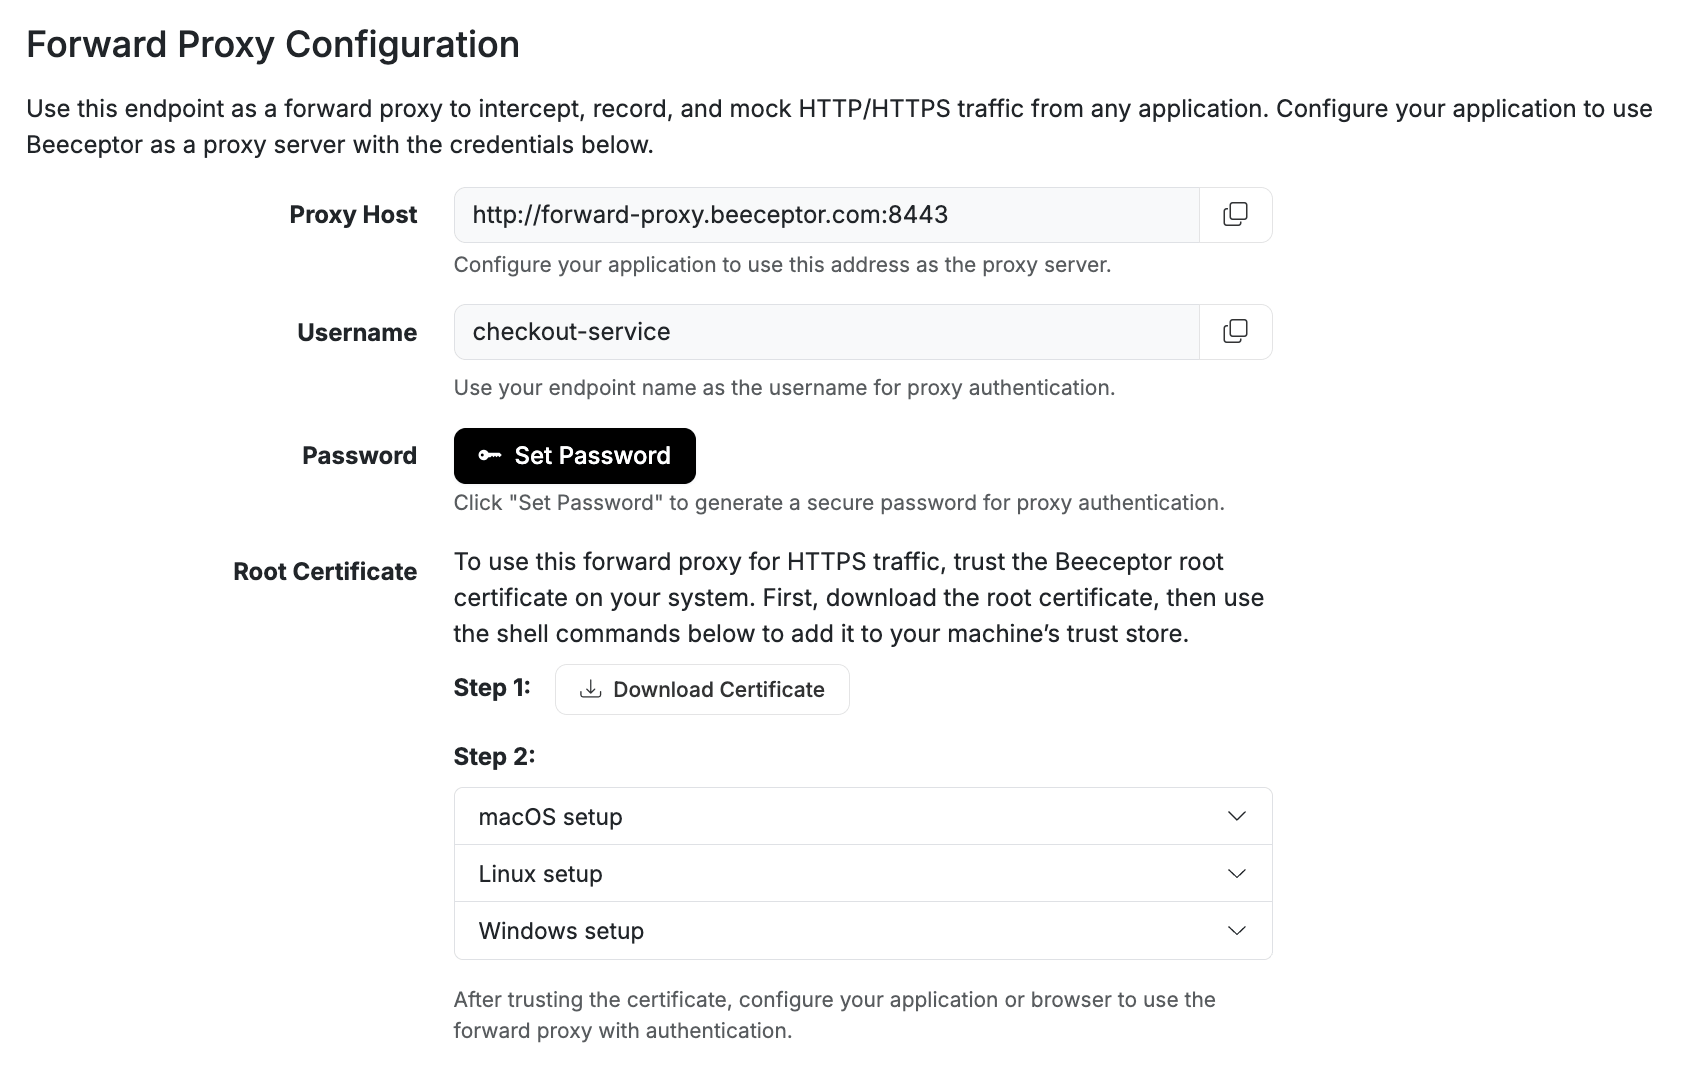
Step 2: Obtain the Proxy Certificate
To intercept HTTPS traffic, the client must trust Beeceptor’s Proxy CA.
- In Forward Proxy Configuration
- Click Download Certificate
- Install it on your system or device
Client Configuration
You can route traffic through Beeceptor in multiple ways. Choose the configuration method that fits your workflow:
- Browser-level debugging
- CLI or backend testing
- System-wide routing
- Mobile device testing
Each option gives you full traffic visibility inside your Beeceptor endpoint console.
Chrome Browser
Launching Chrome with proxy flags is the fastest way to verify your Forward Proxy setup. It isolates the proxy configuration to a temporary browser profile, so your main Chrome setup remains untouched.
Prerequisites
Before launching Chrome:
- Install and trust the Beeceptor Proxy CA certificate on your system
- Keep your endpoint name and proxy password ready
- Choose the Chrome Binary
Choose the Chrome Binary
Use the appropriate executable for your platform:
- macOS:
/Applications/Google\ Chrome.app/Contents/MacOS/Google\ Chrome - Linux:
google-chrome - Windows (PowerShell):
& 'C:\Program Files\Google\Chrome\Application\chrome.exe'
Launch Chrome
## macOS
/Applications/Google\ Chrome.app/Contents/MacOS/Google\ Chrome \
  --proxy-server=http://forward-proxy.beeceptor.com:8443 \
  --no-first-run \
  --no-default-browser-check \
  --disable-background-networking \
  --disable-sync \
  --user-data-dir=/tmp/beeceptor-chrome \
  https://echo.free.beeceptor.com/

## Linux
google-chrome \
  --proxy-server=http://forward-proxy.beeceptor.com:8443 \
  --no-first-run \
  --no-default-browser-check \
  --disable-background-networking \
  --disable-sync \
  --user-data-dir=/tmp/beeceptor-chrome \
  https://echo.free.beeceptor.com/

## Windows (PowerShell)

& 'C:\Program Files\Google\Chrome\Application\chrome.exe' `
  --proxy-server=http://forward-proxy.beeceptor.com:8443 `
  --no-first-run `
  --no-default-browser-check `
  --disable-background-networking `
  --disable-sync `
  --user-data-dir=$env:TEMP\beeceptor-chrome `
  https://echo.free.beeceptor.com/
Playwright
If you run automated browser tests with Playwright, you can route all browser traffic through Beeceptor using Chrome’s built in HTTP proxy. This setup gives you full control over API behavior during end-to-end tests. You can inspect every request, mock selected APIs, and simulate failures or edge cases without changing your application code.
Here, you let Beeceptor act as a forward proxy. All HTTP and HTTPS calls made by Chromium go through your Beeceptor endpoint. From there, you can inspect, mock, or forward traffic as needed.
Prerequisites
Before configuring Playwright, make sure the following are in place:
Install and trust the Beeceptor Proxy CA certificate on the machine that runs your browser and tests. This is required to inspect HTTPS traffic.
- Note your endpoint name. This will be used as the proxy username.
- Copy the forward proxy password from your *Endpoint’s Settings → Forward Proxy Configuration section.
- Configure Playwright to Use Beeceptor Proxy
Configure Playwright
Open your playwright.config.js or playwright.config.ts file and add a project that routes traffic through Beeceptor’s forward proxy.
// playwright.config.js
const { defineConfig, devices } = require('@playwright/test');

module.exports = defineConfig({
  projects: [
    // Proxied Chromium — routes all browser traffic through Beeceptor
    {
      name: 'Proxied Chromium',
      use: {
        ...devices['Desktop Chrome'],
        proxy: {
          server: 'http://forward-proxy.beeceptor.com:8443',
          username: '<ENDPOINT_NAME>',
          password: '<PASSWORD>',
        },
      },
    },
  ],
});
Replace:
<ENDPOINT_NAME>with your Beeceptor endpoint name<PASSWORD>with the forward proxy password from the endpoint settings
Now run your tests using the proxied project:
npx playwright test --project="Proxied Chromium"
From this point on, every request made by the browser in that project flows through Beeceptor.rules.
Behind the Scenes
Behind the scenes, Playwright communicates with Chromium using the Chrome DevTools Protocol (CDP). When the browser encounters a proxy authentication challenge, Playwright handles it programmatically by supplying the configured proxy credentials through CDP.
Terminal / Shell
If you are testing backend services, SDKs, CLI tools, or scripts, environment variables are the simplest option.
Set proxy variables in your shell:
# http traffic
export http_proxy=http://[ENDPOINT_NAME]:[PASSWORD]@forward-proxy.beeceptor.com:8443

# https traffic
export https_proxy=http://[ENDPOINT_NAME]:[PASSWORD]@forward-proxy.beeceptor.com:8443
Testing the Configuration:
Once configured, test with curl or any HTTP client:
curl https://echo.free.beeceptor.com/
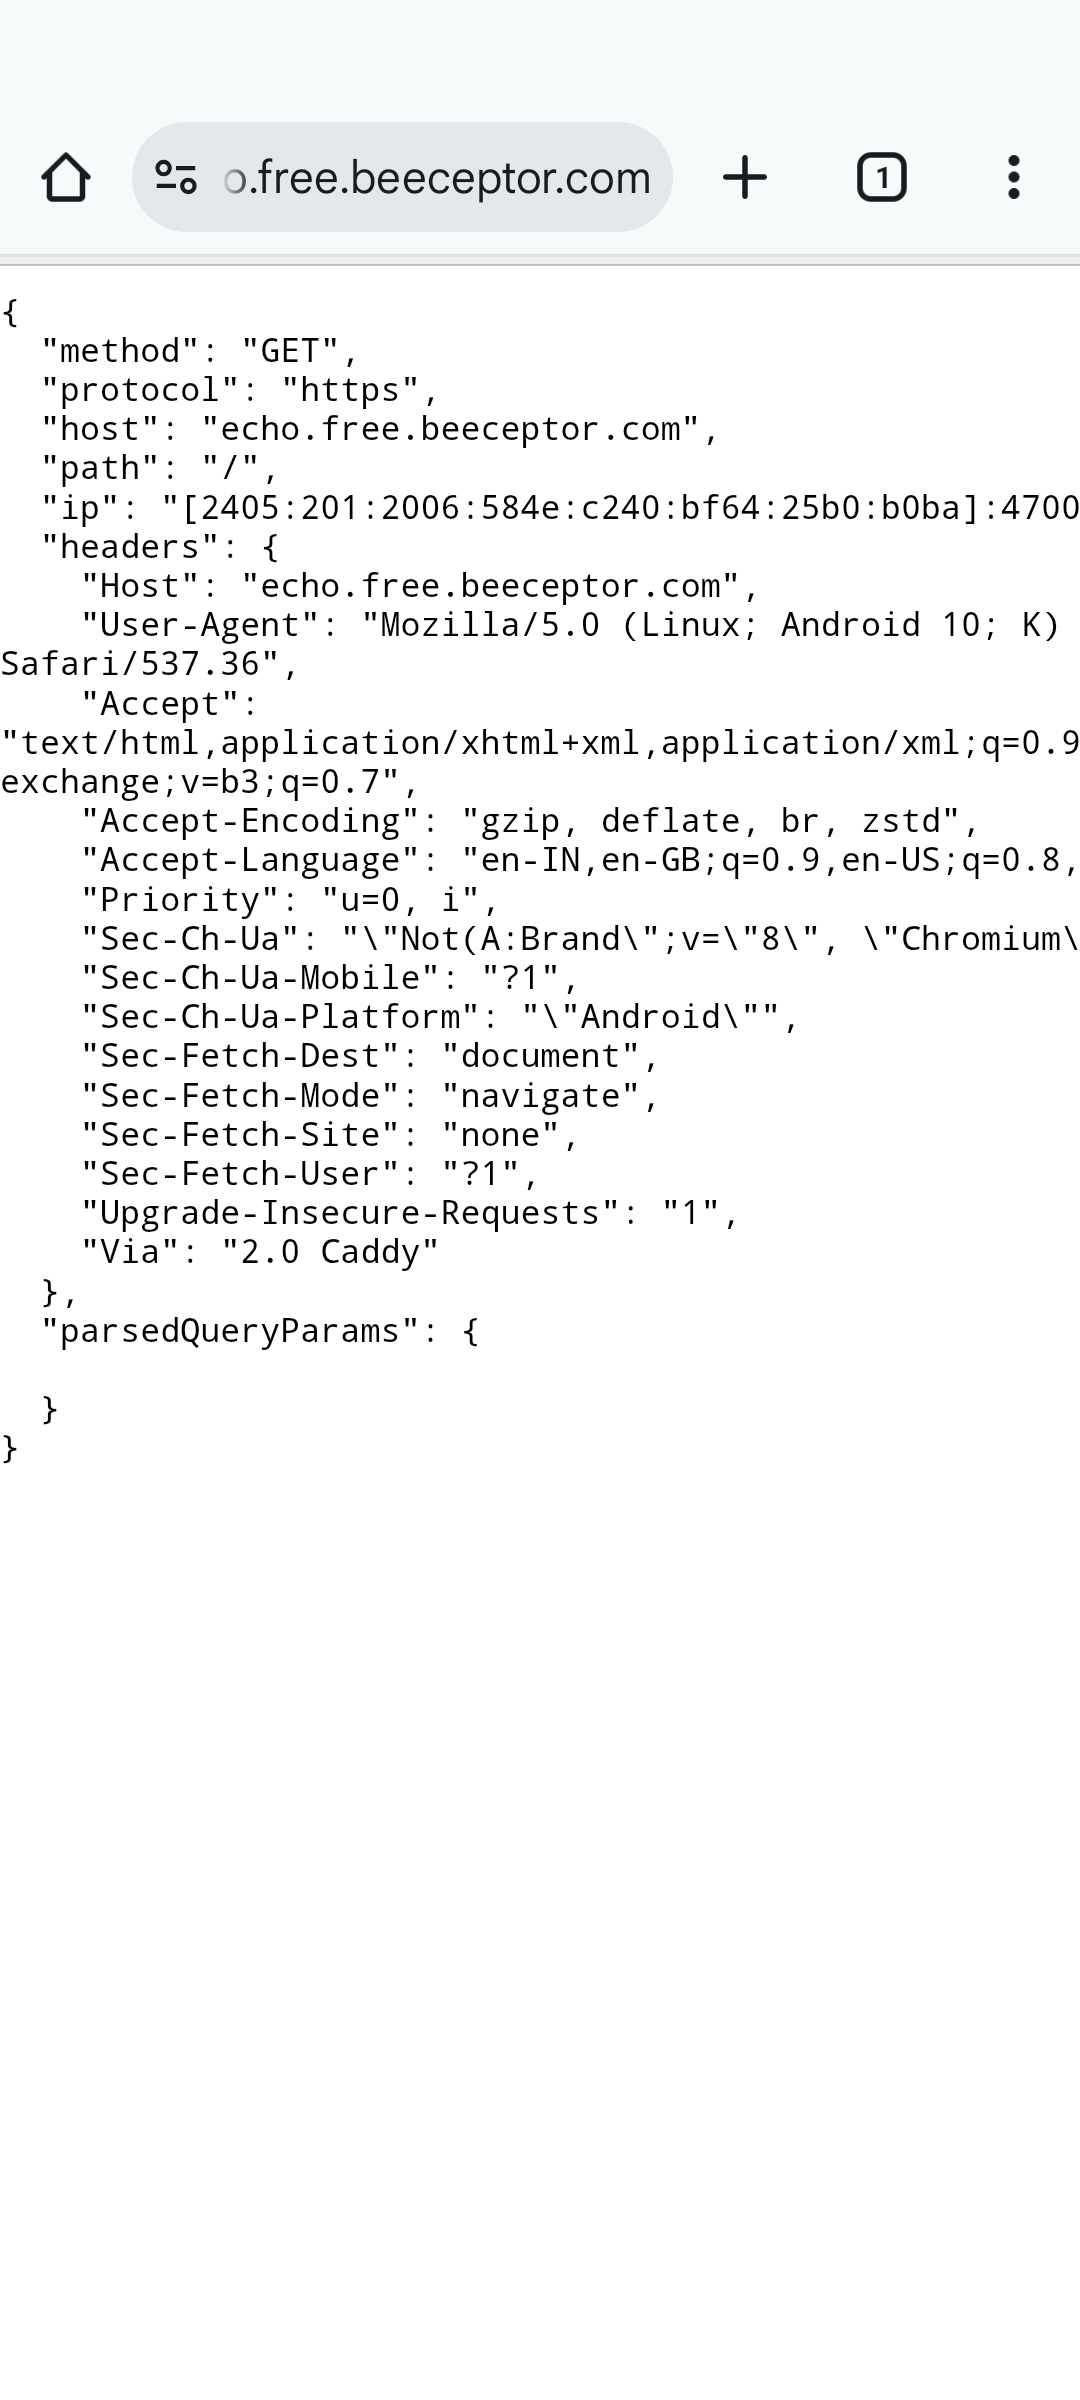
If configured correctly:
- The request appears in Beeceptor endpoint's console.
- The echo service responds with request details.
- HTTPS traffic is decrypted and visible.
You can now debug real API calls directly from your terminal.
macOS System
If you want to route all system traffic through Beeceptor, configure proxy settings at the OS level.
Install Certificate (macOS)
To properly inspect HTTPS traffic, install and trust the CA certificate:
sudo security add-trusted-cert -d -r trustRoot -k /Library/Keychains/System.keychain /path/to/beeceptor-proxy-ca-com.pem
Enter your macOS password when prompted.
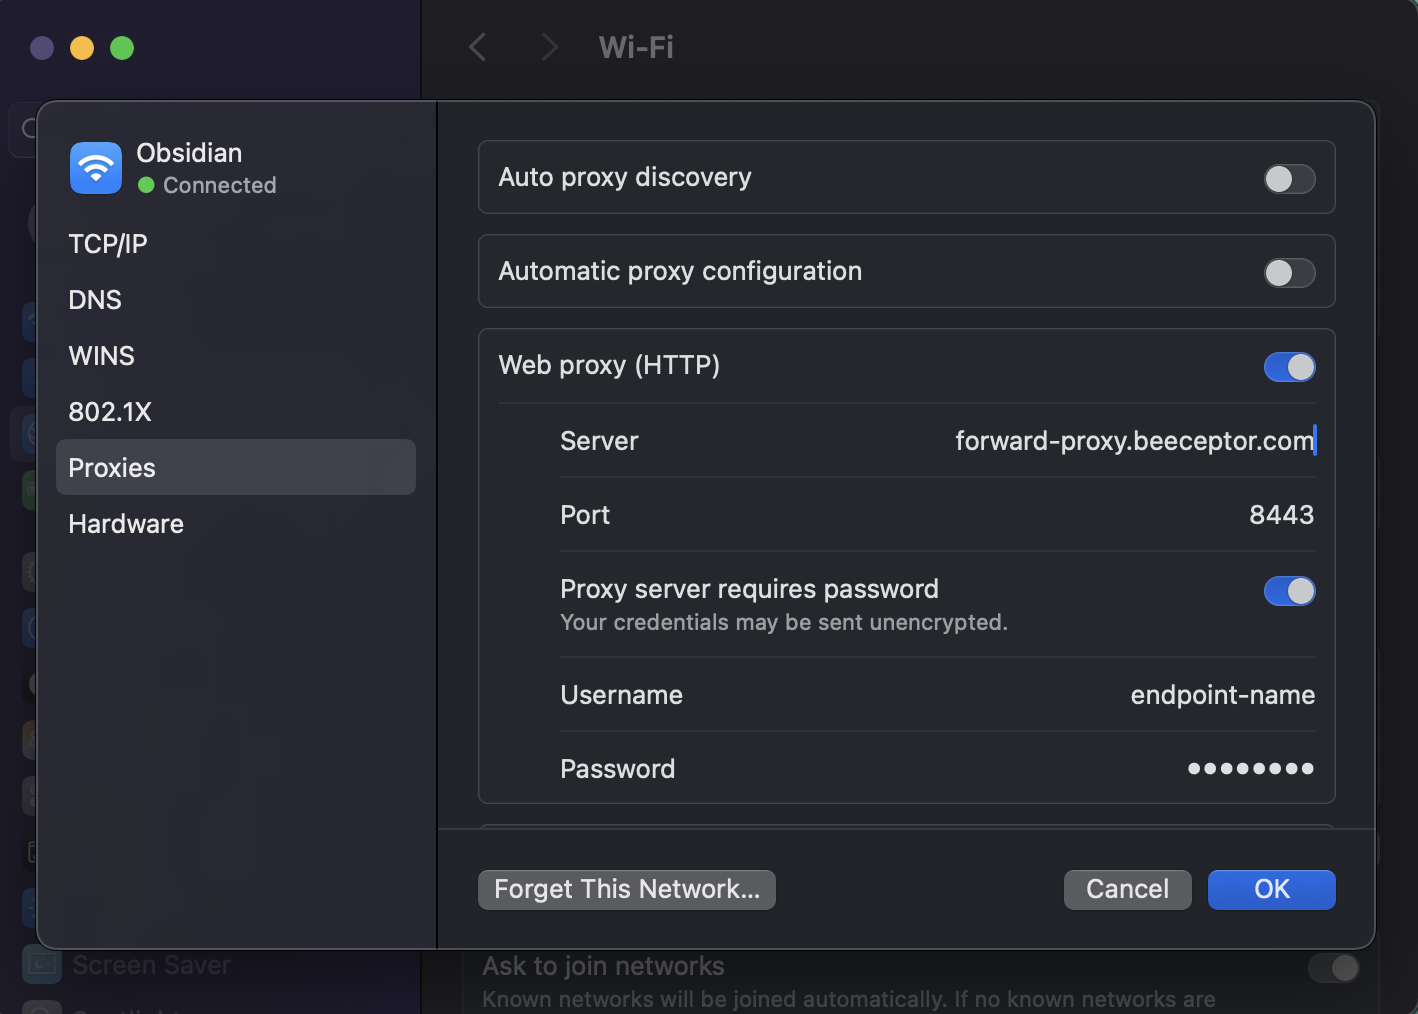
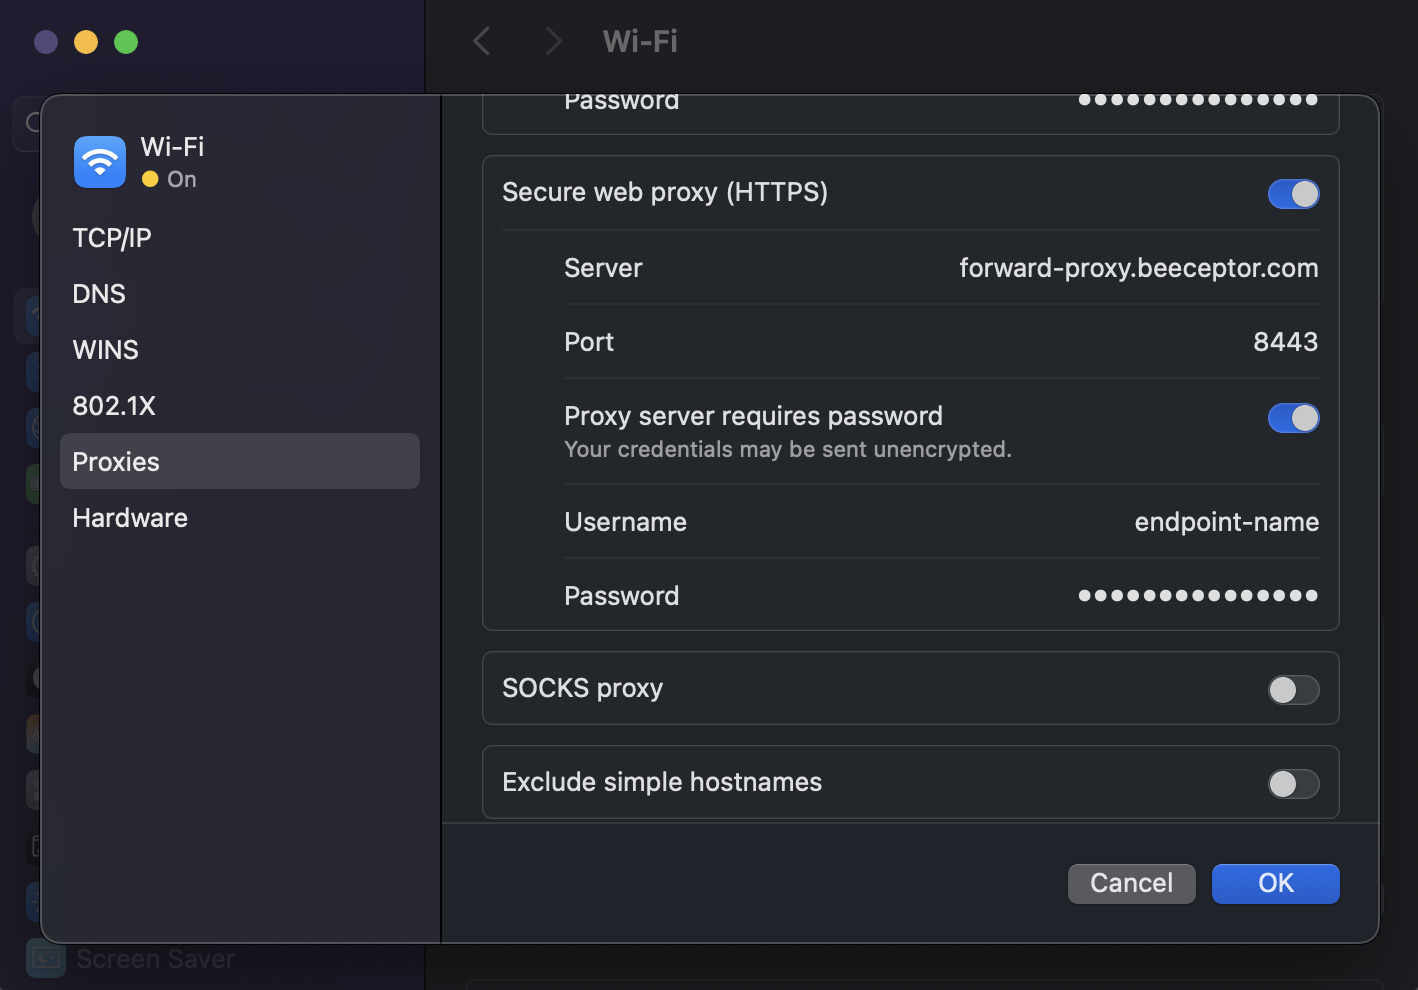
Configure macOS Proxy Settings
To route all system traffic through the forward proxy on macOS, configure it in System Preferences.
Steps:
- Open System Settings → Network
- Select active connection (Wi-Fi or Ethernet)
- Click Details
- Open the Proxies tab
- Enable:
- Web Proxy (HTTP)
- Secure Web Proxy (HTTPS)
- Configure both:
- Server: forward-proxy.beeceptor.com
- Port: 8443
- Username: Endpoint name
- Password: Proxy password
- Click OK, click Apply
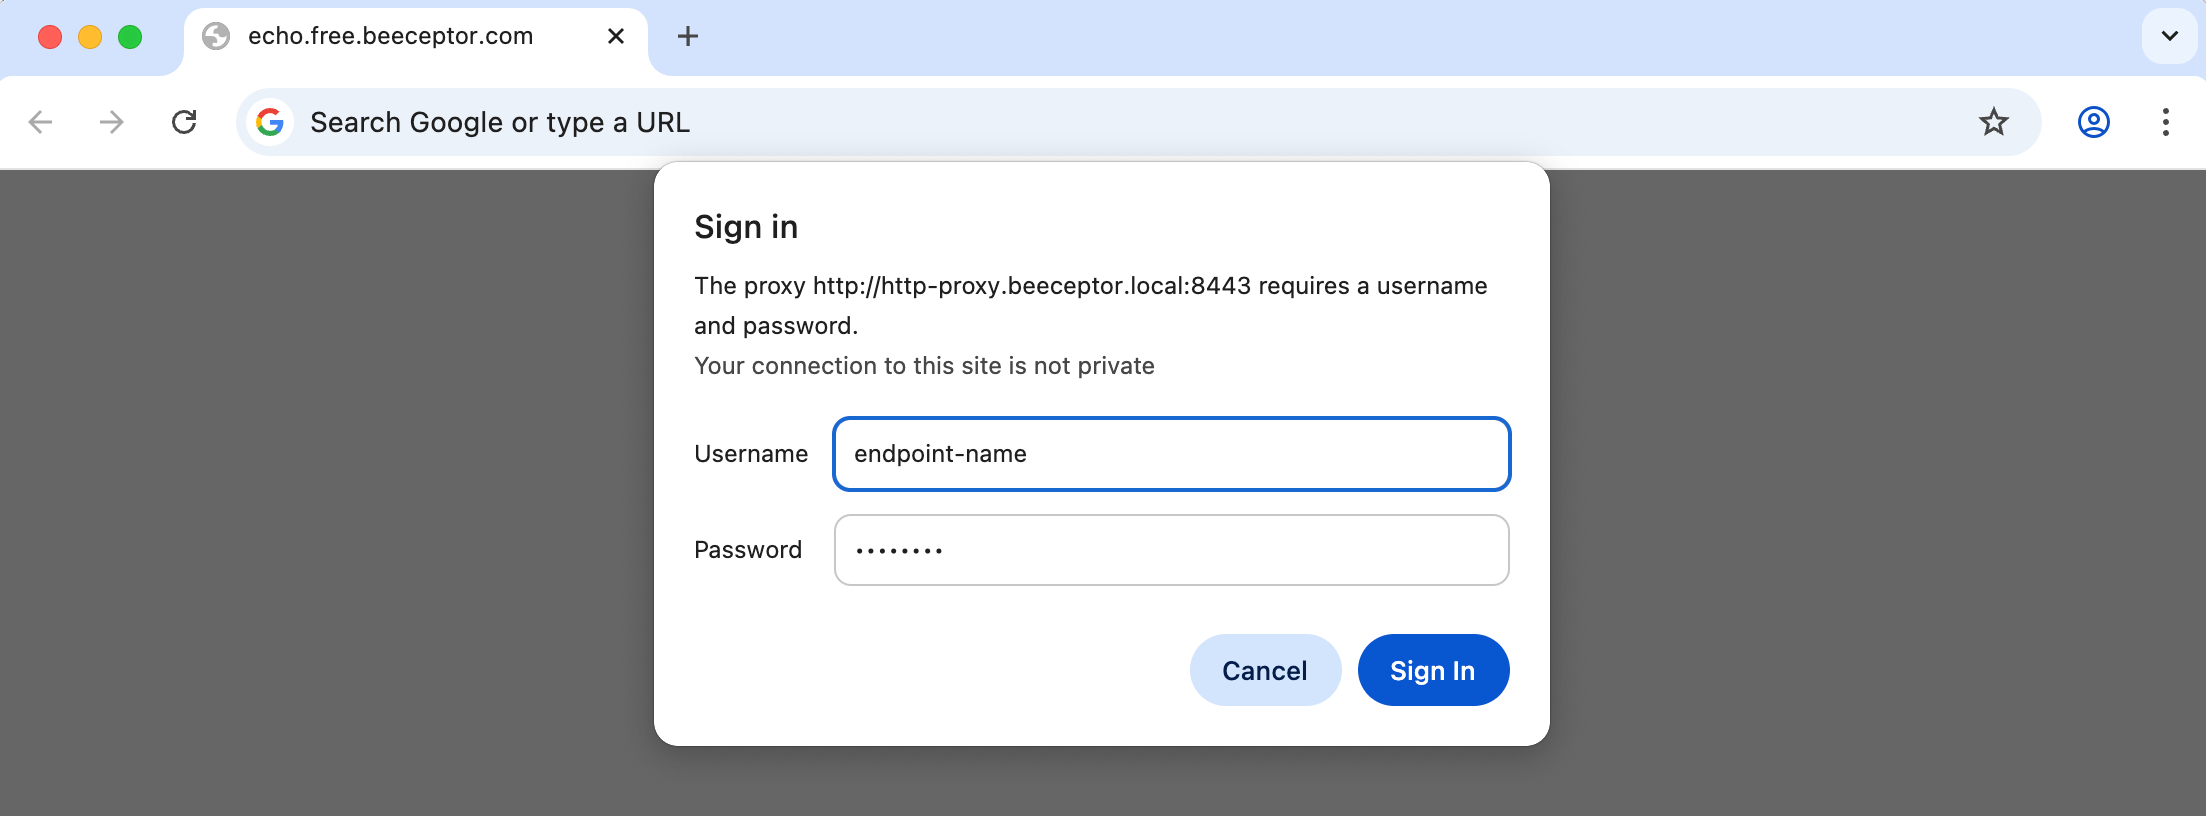
Verification
Open a browser and navigate to:
https://echo.free.beeceptor.com/
You should:
- See authentication prompt
- See request in Beeceptor Console
- Receive echo response with request details
All system traffic is now routed through Beeceptor.
Android System
Forward Proxy also works on mobile devices. This helps when testing mobile apps that communicate with external APIs.
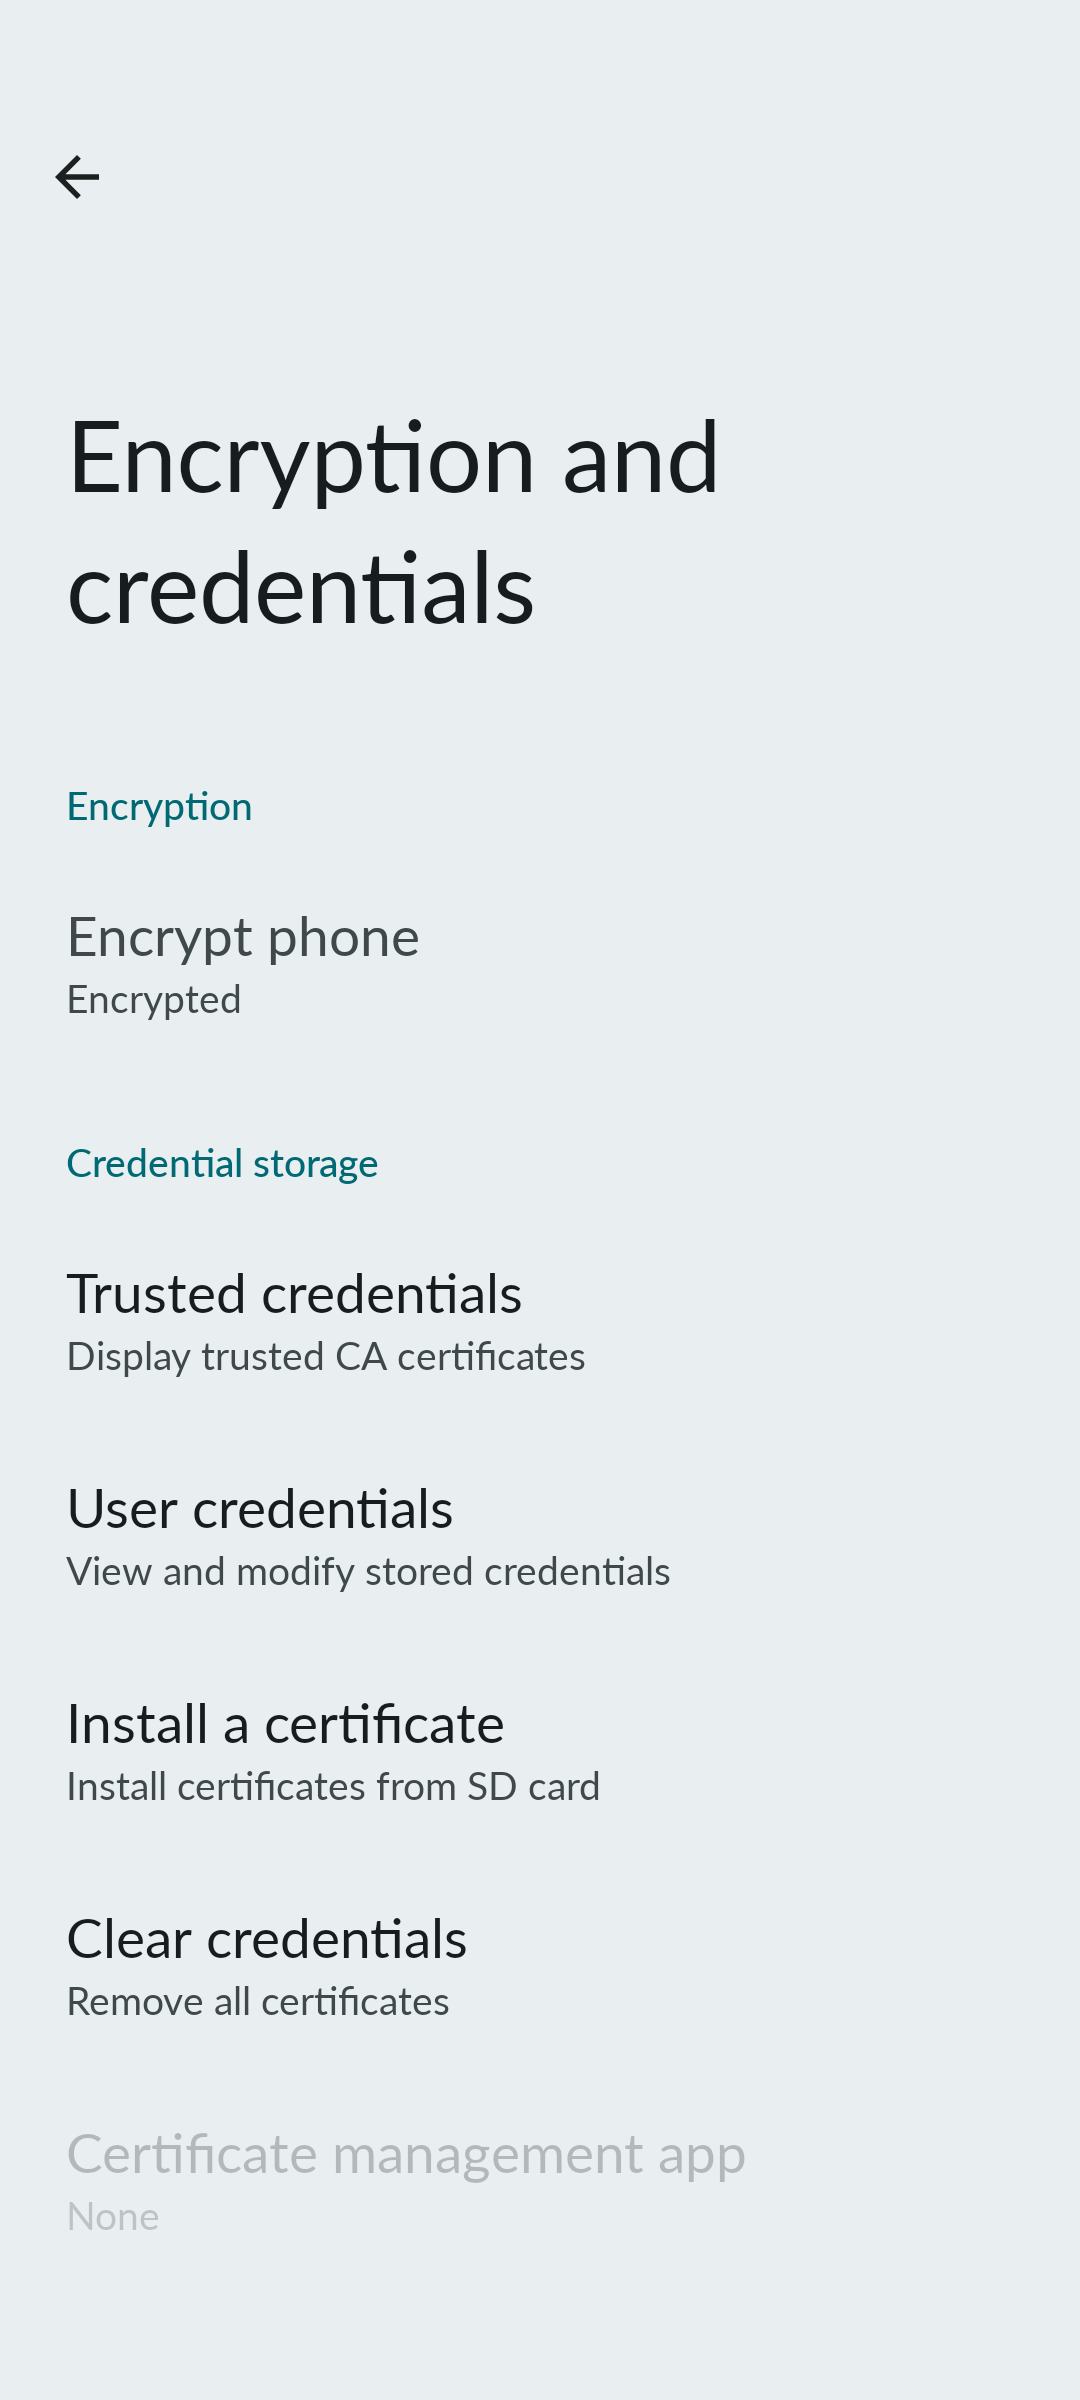
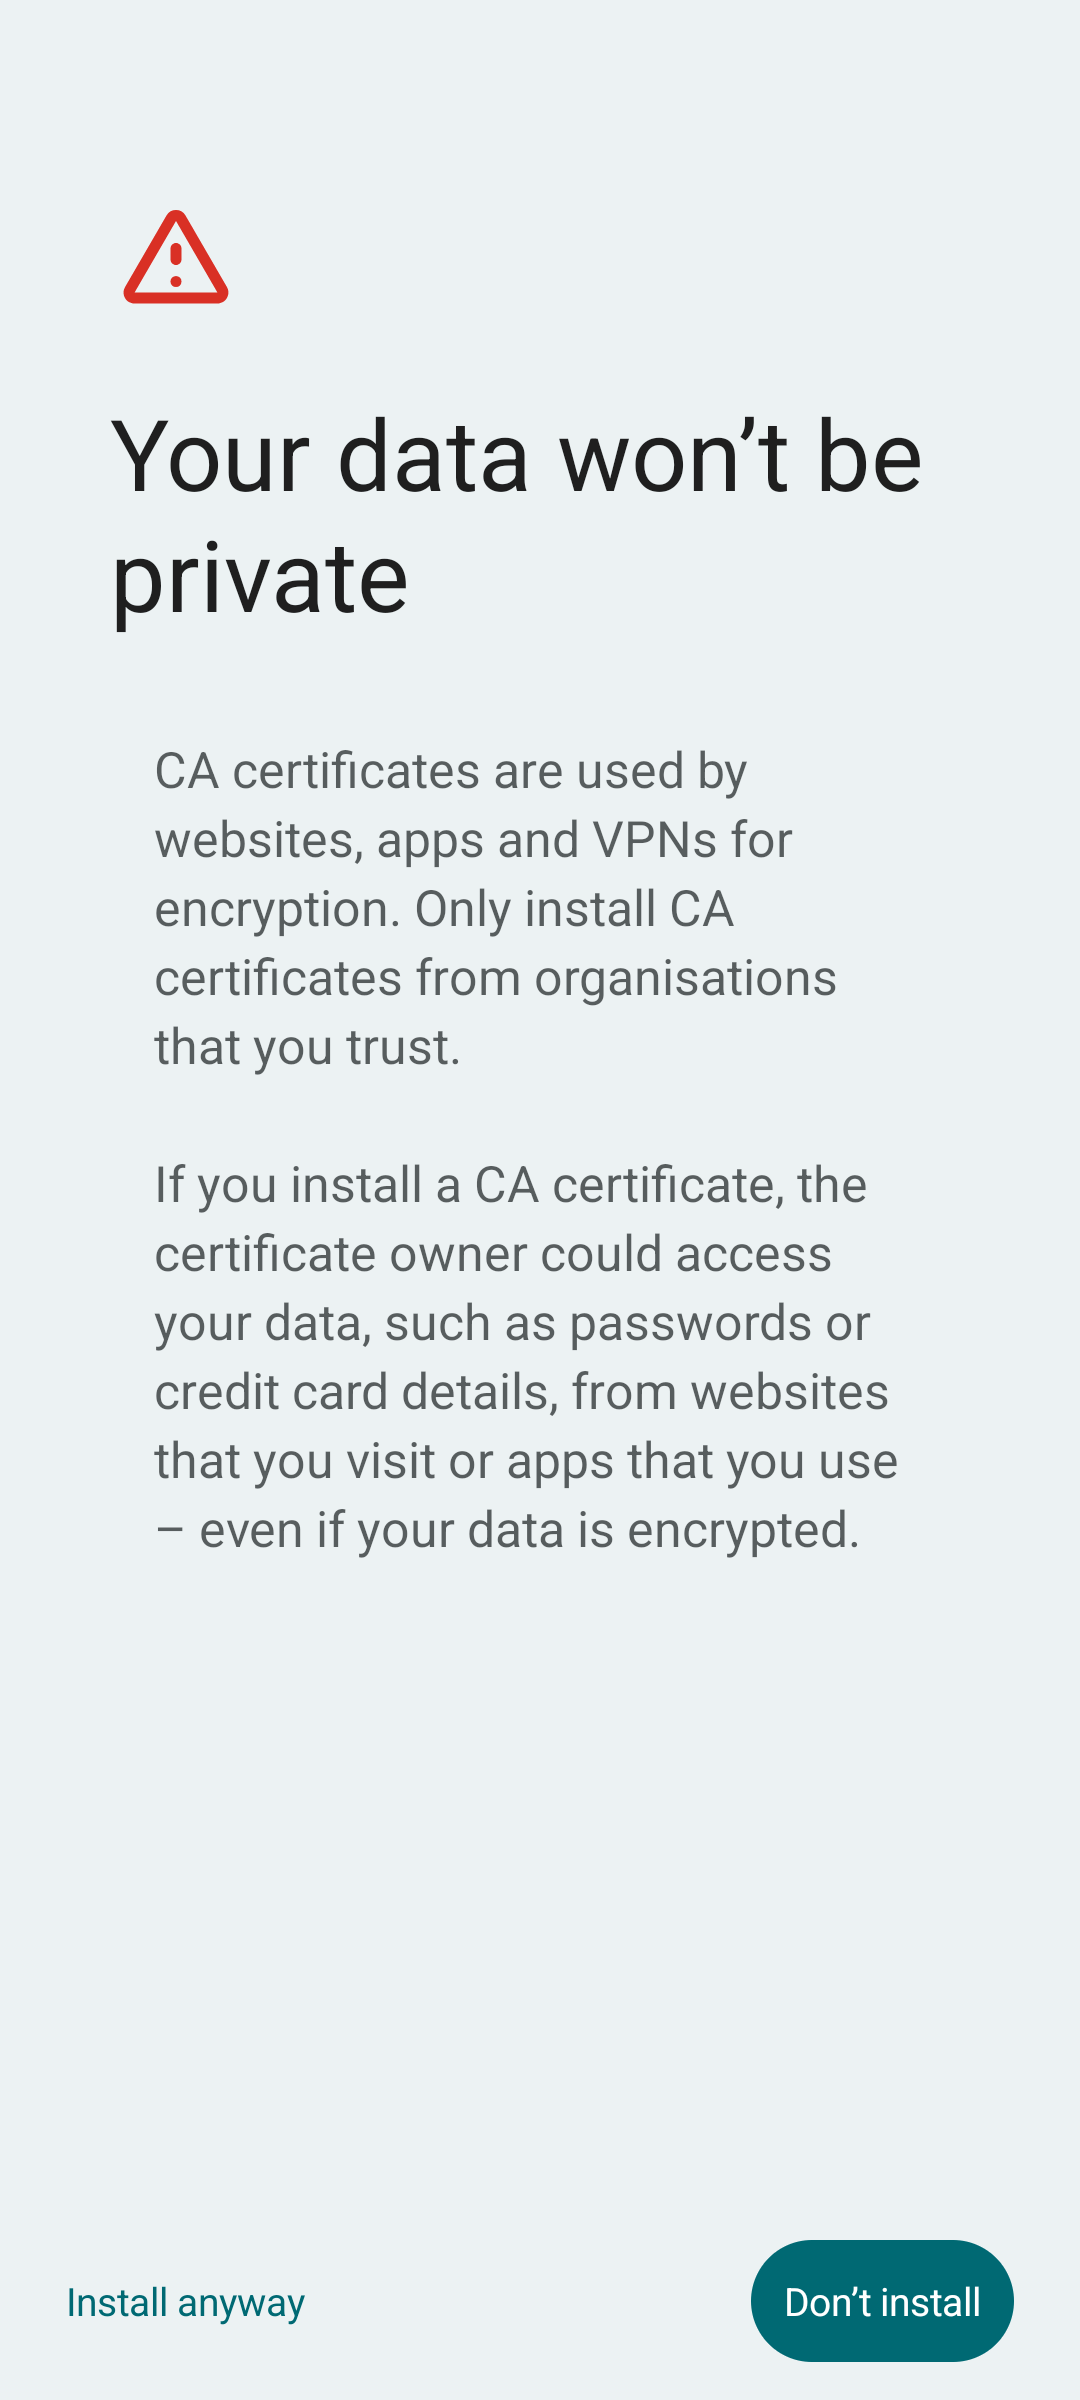
Install Certificate on Android
For HTTPS traffic interception, install the Beeceptor Proxy CA certificate on your Android device.
Steps:
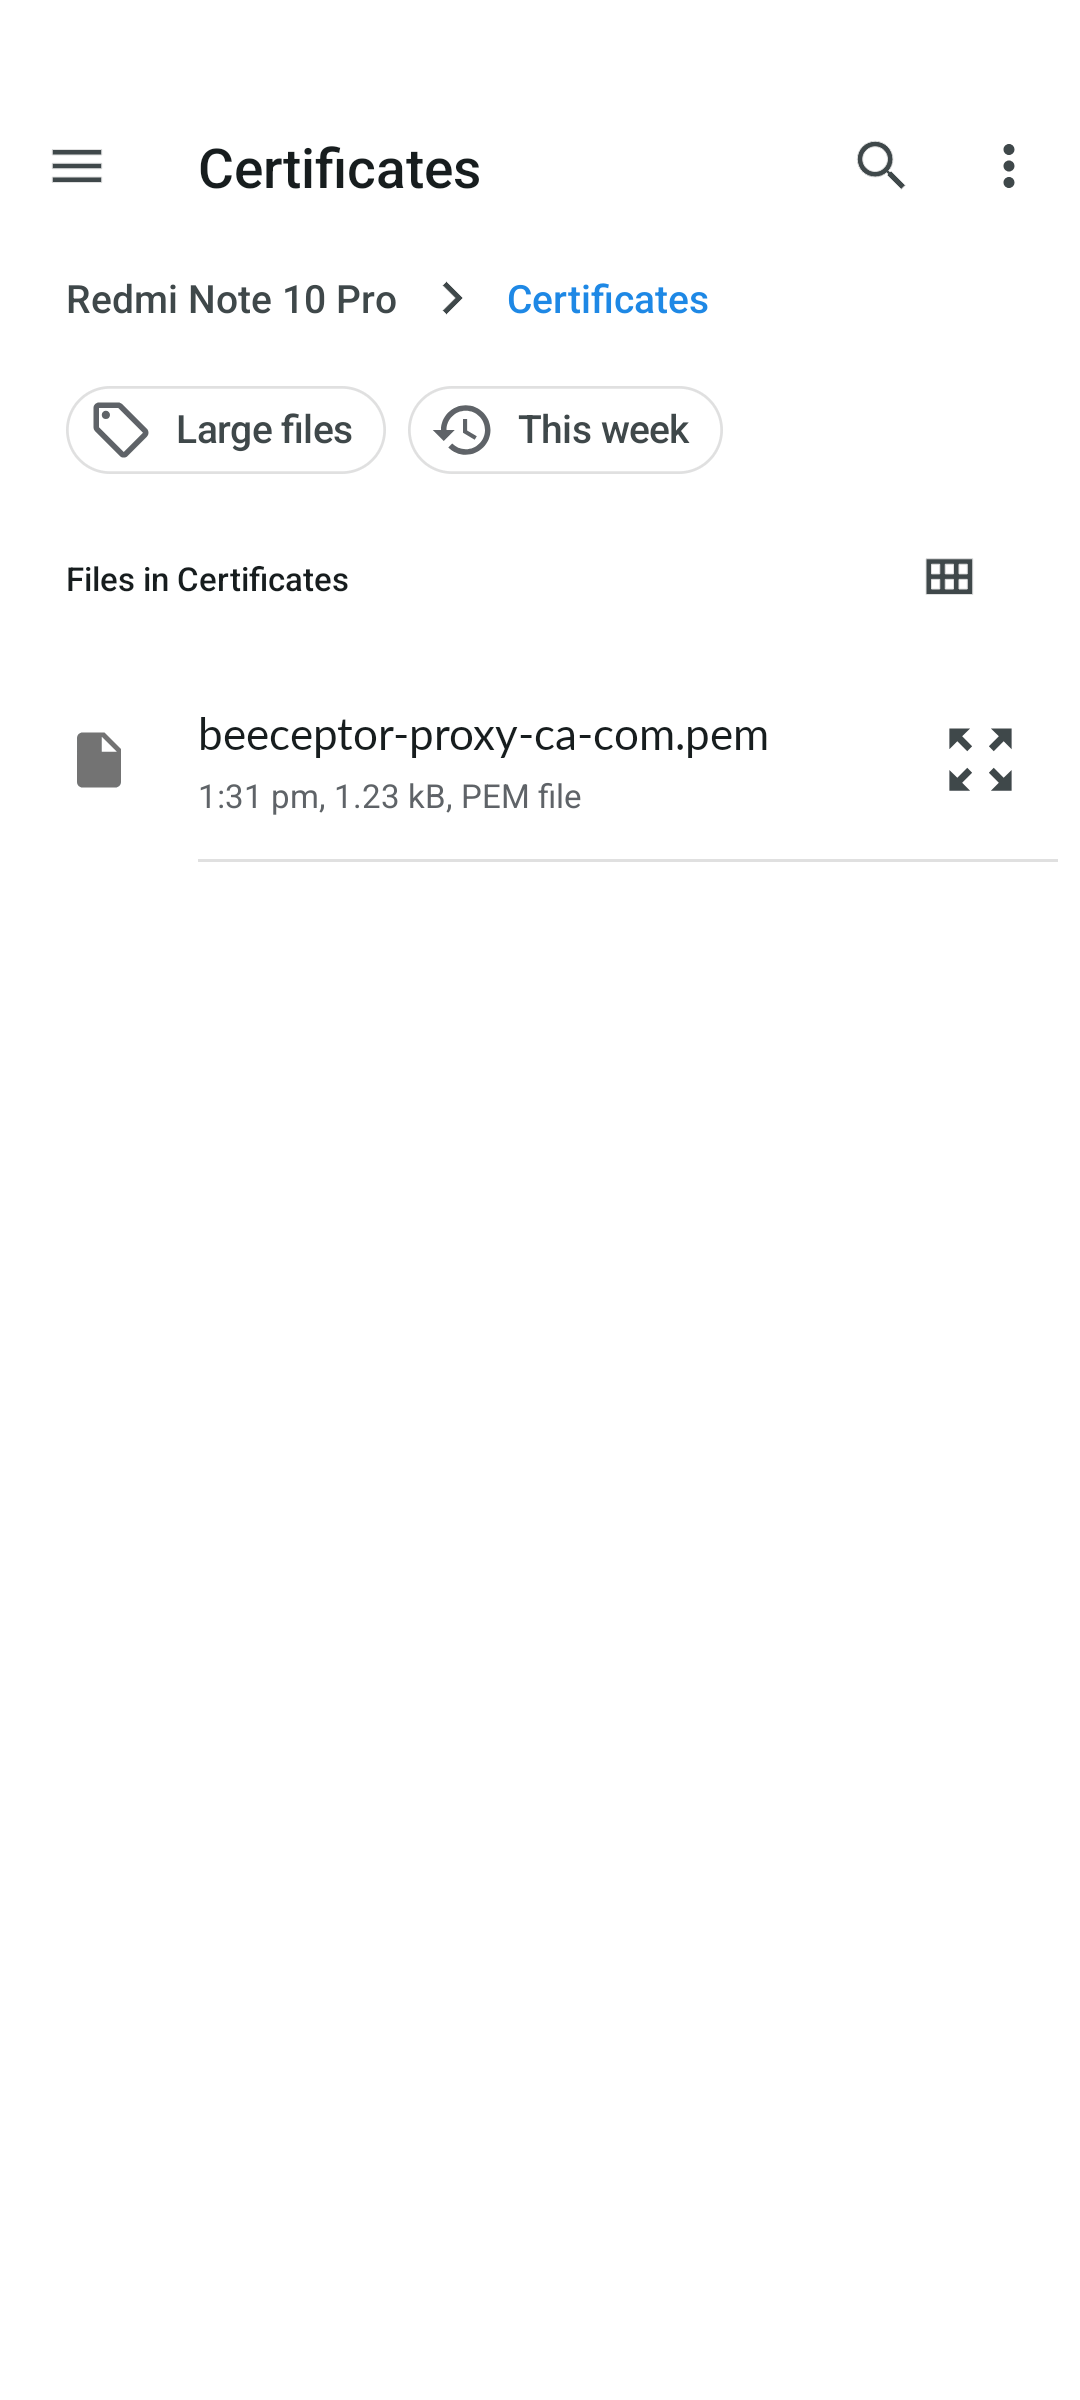
- Download the certificate from your endpoint settings to your Android device
- Open Settings → Security → Encryption & credentials → Install from storage
- Select the downloaded certificate file (e.g.,
beeceptor-proxy-ca-com.pem) - Follow the prompts to name the certificate and complete the installation

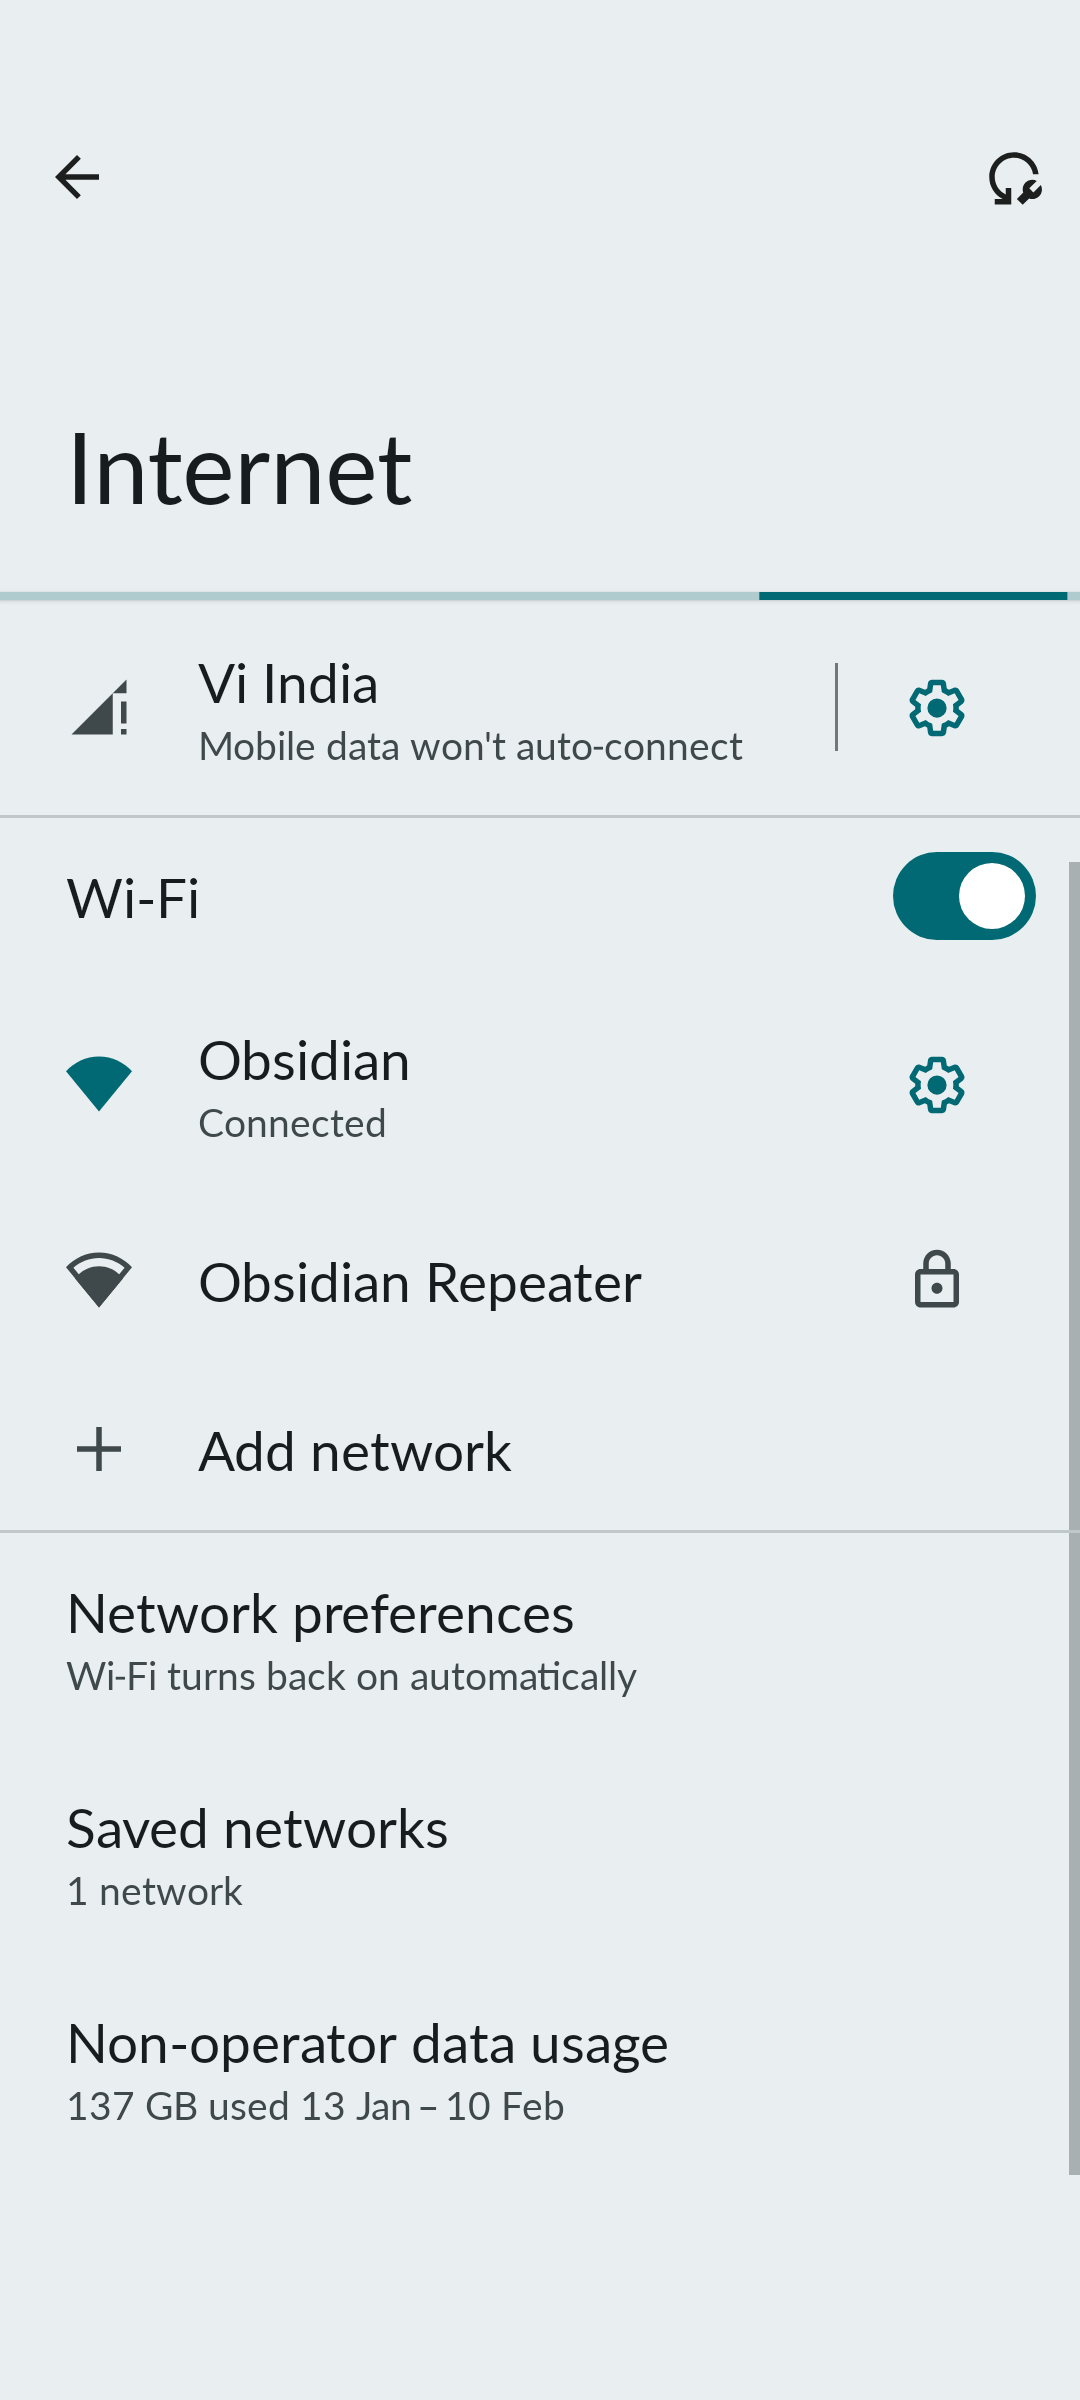
Configure Android Wi-Fi Proxy
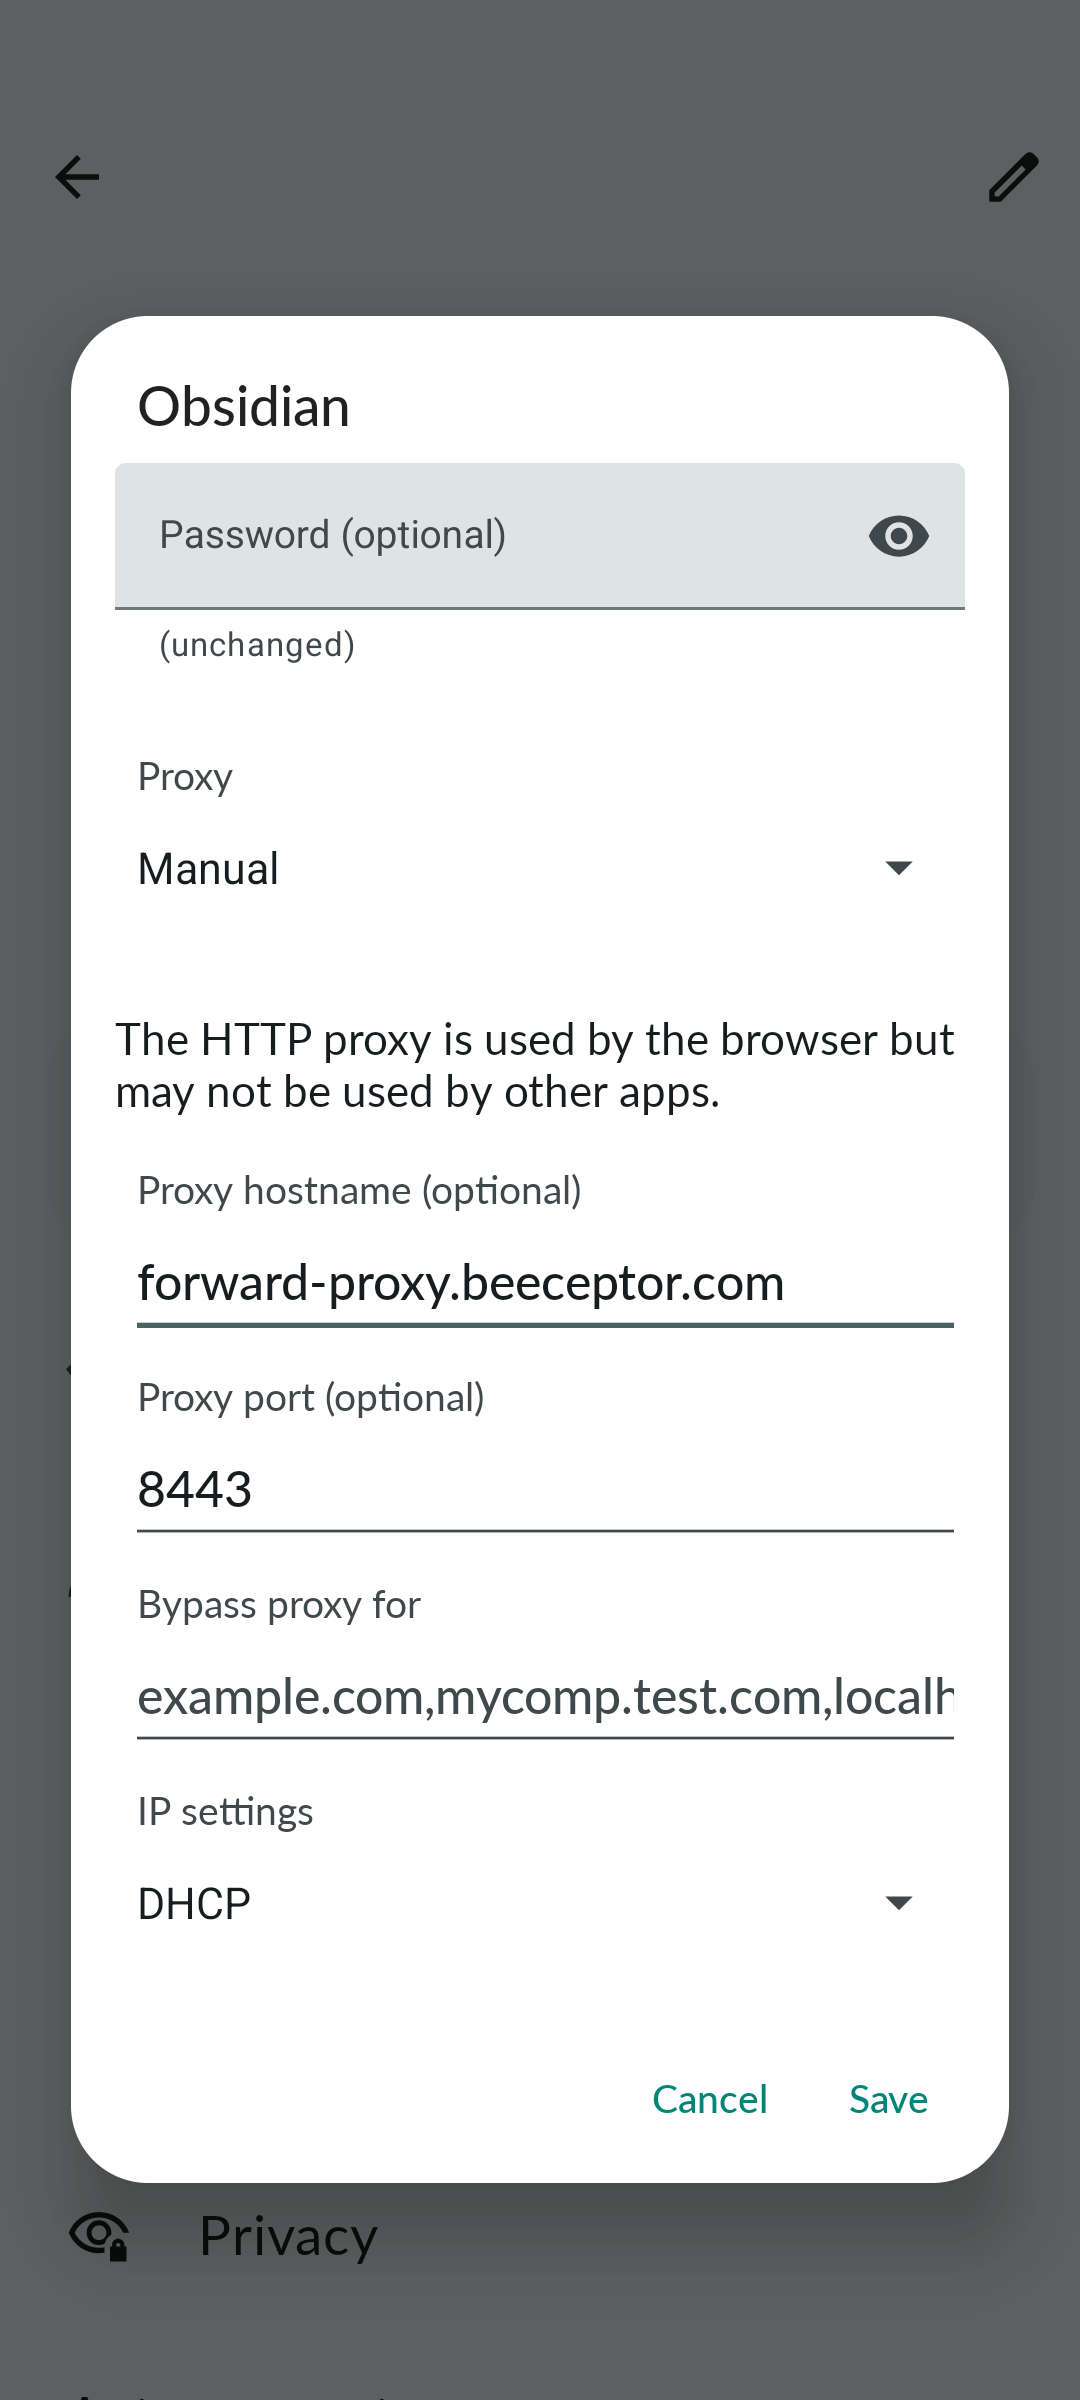
To route all traffic through the forward proxy on Android, configure it in your network settings.
Steps:
- Open Settings → Network and Internet → Wi-Fi
- Go to active Wi-Fi network and tap the Settings icon
- Click on Edit (pencil icon) to modify the network
- Under Advanced Options → Proxy, select Manual
- Enter:
- Proxy hostname:
forward-proxy.beeceptor.com - Proxy port:
8443
- Proxy hostname:
- Tap Save
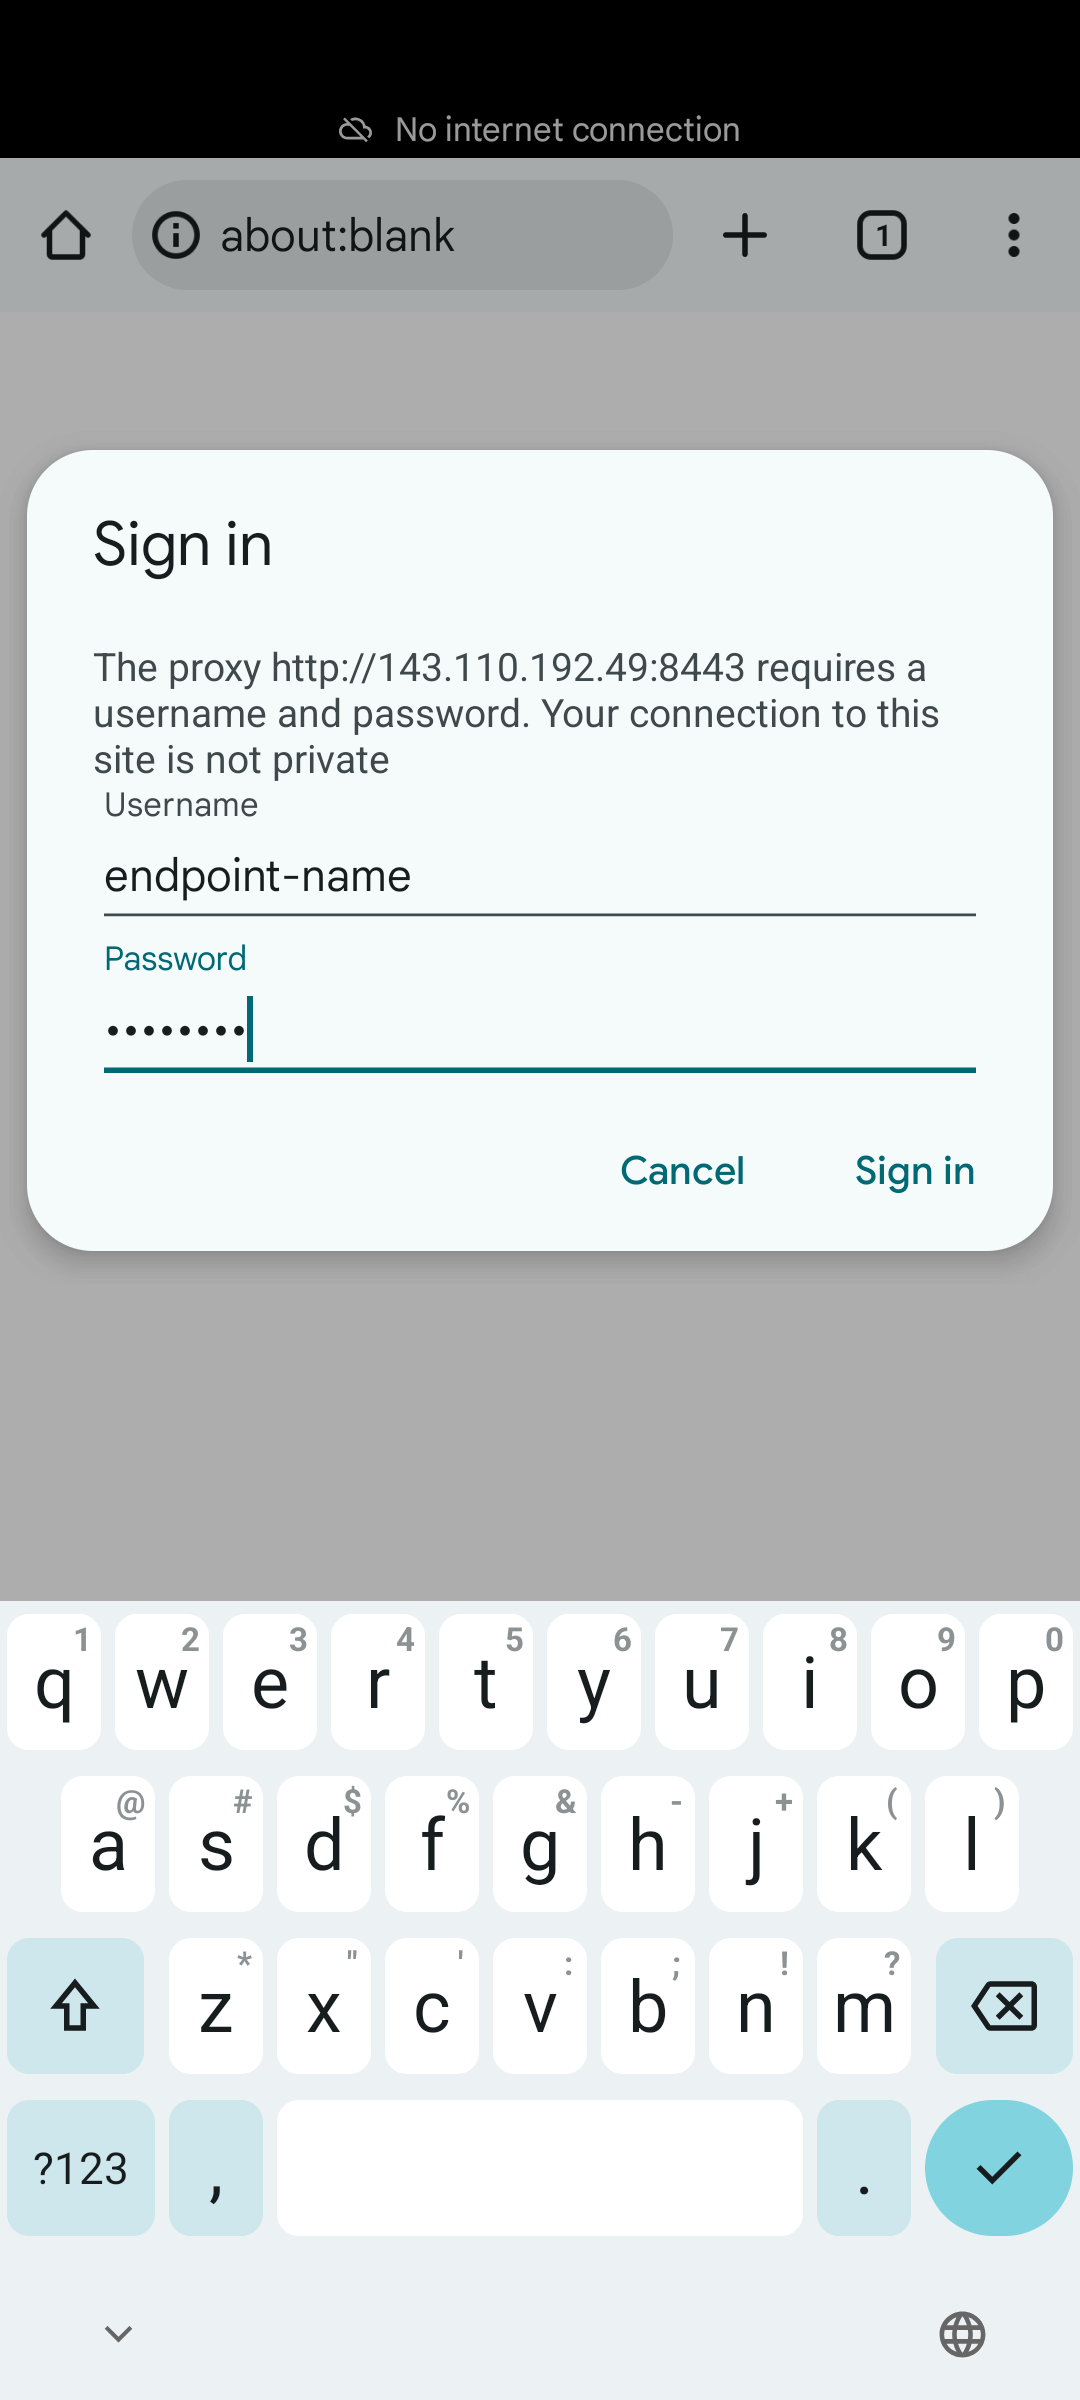
Verification
Open Chrome on the device and visit:
https://echo.free.beeceptor.com/
Authenticate with:
- Username → Endpoint name
- Password → Proxy password
Traffic Interception
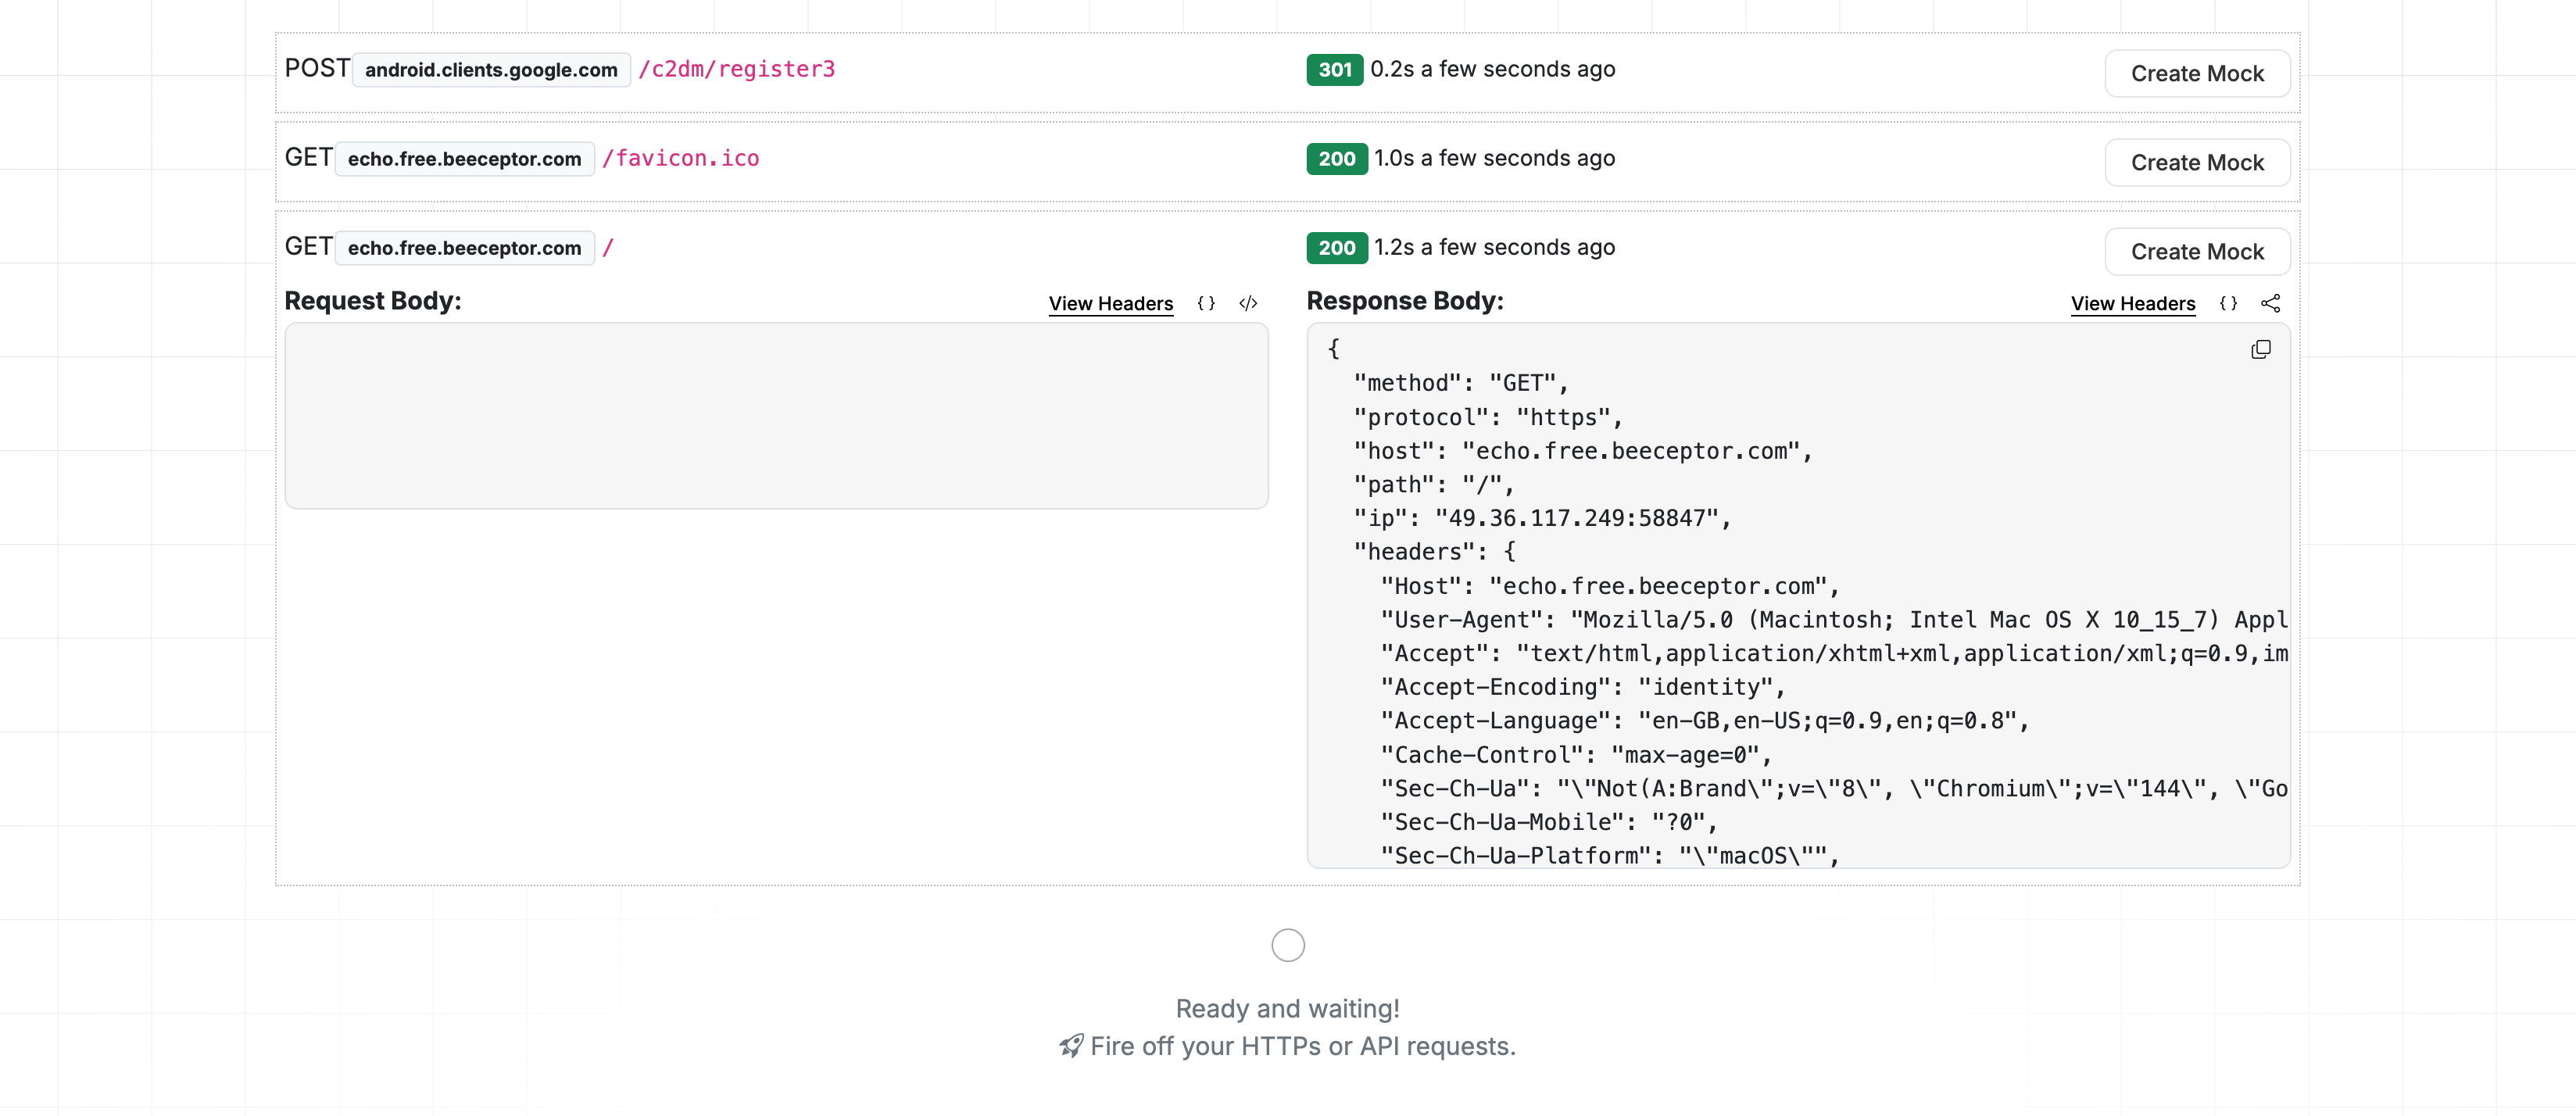
Once your client is configured to use Beeceptor as a forward proxy, every outgoing HTTP and HTTPS request flows through your endpoint before reaching the destination server.
This gives you full visibility into how your application communicates with external APIs in real time. Instead of guessing what your code is sending, you can now see the exact request as it leaves your system, including headers, payload, and timing information.
Real-Time Request Capture
- Navigate to your endpoint's Console page
- All requests routed through the forward proxy will appear in the Requests table
- Each row shows:
- Timestamp - When the request was received
- Method - HTTP method (GET, POST, etc.)
- Host - Target domain (e.g.,
google.com) - Path - Request path
- Status Code - Response status (if received)
Host-Level Filtering
When your application communicates with multiple external services, the Console may show traffic for many domains.
Use the Host Filter dropdown to narrow down requests to a specific upstream service.
For example, if your app talks to:
- A payment provider
- A logging service
- An analytics API
You can filter and focus on just one integration at a time. This reduces noise and speeds up debugging.
Mocking Specific Requests
Intercepting traffic gives you visibility. Mocking gives you control. The forward proxy integrates seamlessly with Beeceptor's mocking system. You can create mock rules to respond with custom data or behavuor instead of forwarding requests to the upstream server.
You can create different types of mock rules based on your testing needs:
- Static responses for fixed payloads
- Dynamic responses using request parameters and templating
- Stateful behavior to simulate multi-step workflows
- Conditional rules based on headers, body content, query parameters, or path matching
These request-based filters give you precise control to device which requests are mocked and which are allowed to pass through to the upstream server.