React sample project: Task Manager
Ready to build a Task Manager app with React?
In this tutorial, we'll skip the backend hassle and use Beeceptor's CRUD Mock Rules to handle data persistence. You will set up a mock API that acts like a real database, then connect a React frontend to it. We'll walk through creating the project, implementing fetch logic, and adding features to create, update, and delete tasks. By the end, you'll have a fully functional app with optimistic UI updates. Let's dive in and start coding your serverless CRUD application!
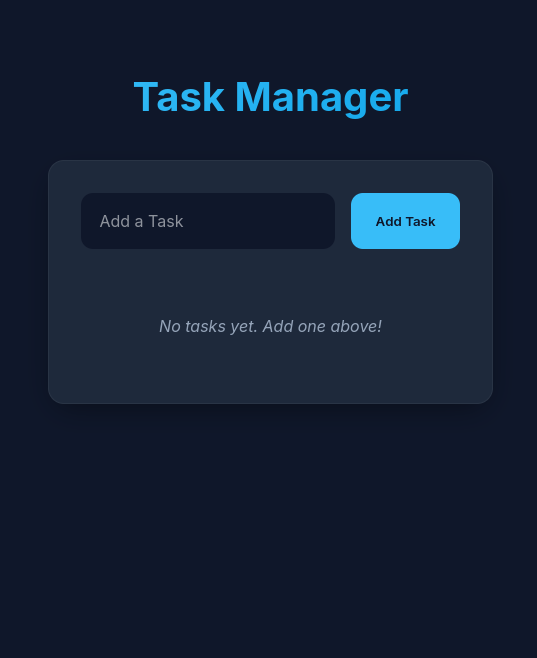
Here is how it will look at the end:
You can find the complete source code for this project on GitHub: React Task Manager with Beeceptor CRUD
Prerequisites
Before you begin this tutorial, you'll need the following:
- Node.js and npm installed on your local machine. You can download them from nodejs.org.
- Basic familiarity with React and modern JavaScript (ES6+).
- A Beeceptor account (free). Sign up at beeceptor.com if you don't have one.
- A code editor such as VS Code, Sublime Text, or your preferred IDE.
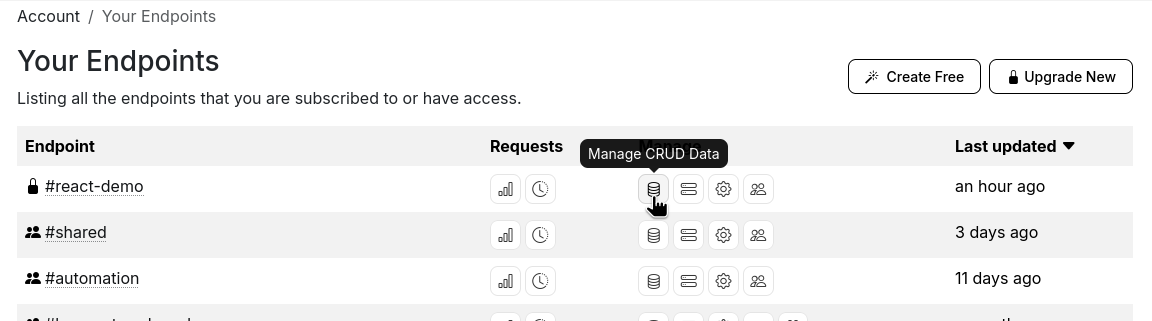
Step 1: Create a Beeceptor Endpoint
Start by creating a dedicated endpoint that will act as your mock backend.
- Navigate to Beeceptor and log in to your account.
- Click "Create Endpoint" on the dashboard.
- Enter a unique endpoint name (e.g.,
react-demo) and click "Create".
Once created, copy your endpoint URL (e.g., https://react-demo.proxy.beeceptor.com). You will use this URL to connect your React application to the mock API.

Step 2: Set Up a CRUD Mock Rule
Beeceptor supports full CRUD behavior out of the box. When you attach a CRUD rule to a path, Beeceptor stores objects for you and exposes RESTful APIs automatically.
- From your endpoint dashboard, click "Create New Rule" and select "Set Up a CRUD Route".
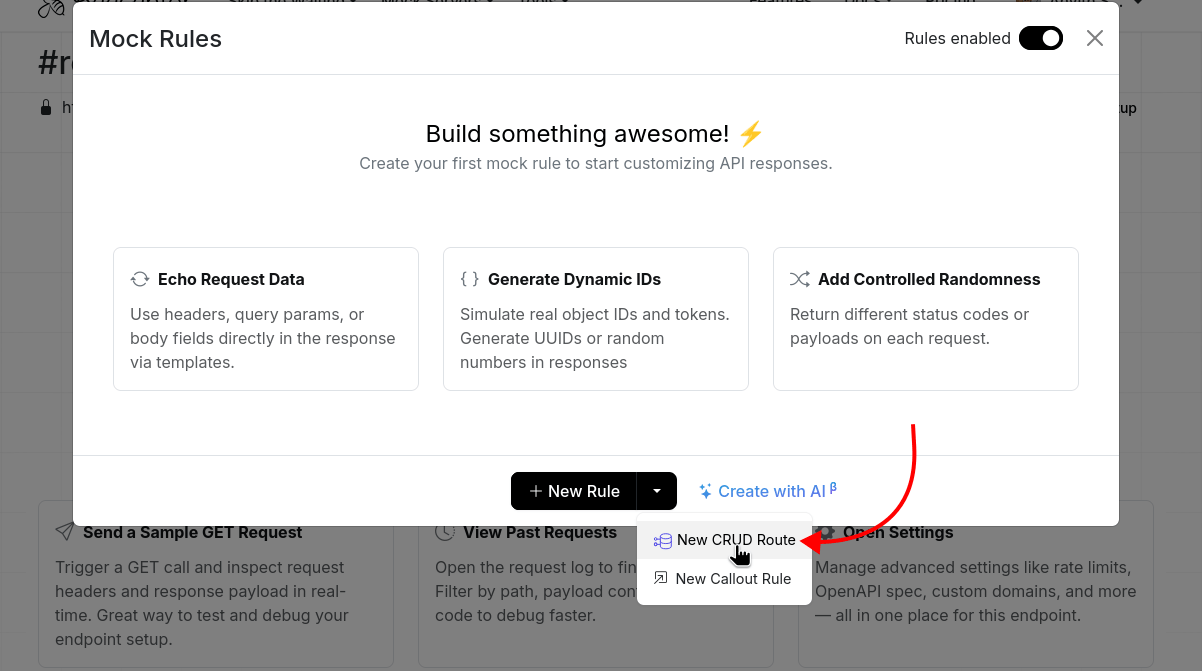
- Select "CRUD Mock" as the rule type.
- Set the Path field to
/api/todos.
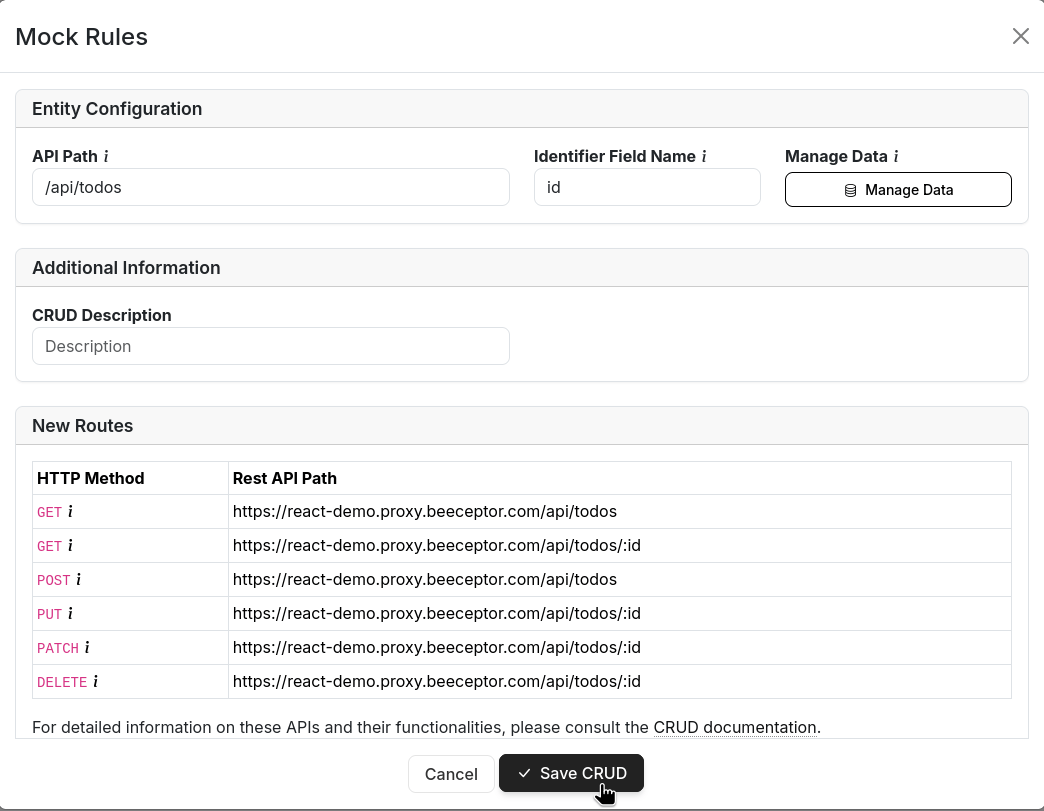
- Click "Save".
Once saved, Beeceptor automatically generates the following RESTful endpoints:
GET /api/todos: Returns a list of all tasksPOST /api/todos: Creates a new task with an auto-generated IDGET /api/todos/:id: Returns a single task by IDPUT /api/todos/:id: Updates an existing task by IDDELETE /api/todos/:id: Deletes a task by ID
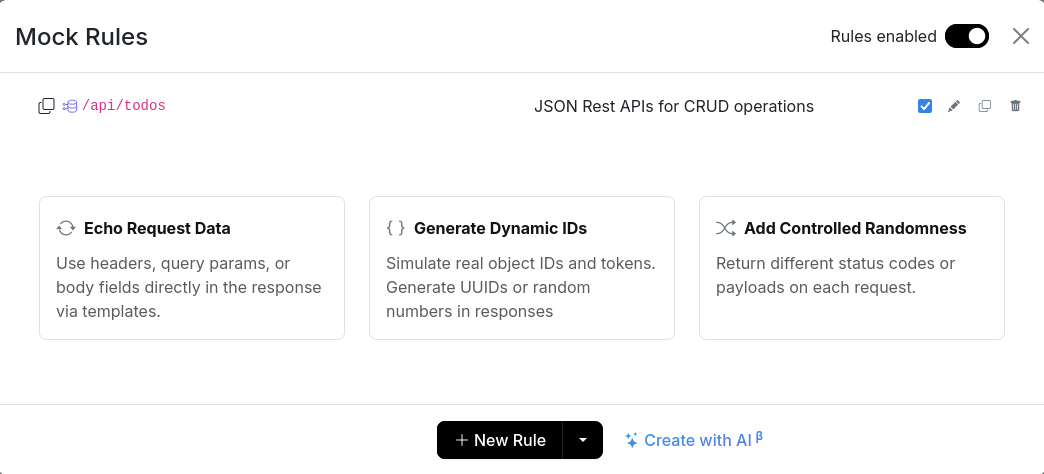
All data is stored in-memory on Beeceptor's servers and persists across requests during your session.
You can test these endpoints immediately using tools like curl, Postman, or your browser's developer console.
Step 3: Create a React Application
Initialize a new React project using Vite. This helps in faster development. Open your terminal and run the following commands:
# Create the project
npm create vite@latest react-task-manager -- --template react

# Navigate into the directory
cd react-task-manager

# Install dependencies
npm install
Note on Styling: This tutorial focuses on the React and Beeceptor CRUD functionality. For the complete CSS styling used in the demo, refer to the GitHub repository. The
src/index.cssandsrc/App.cssfiles contain the full styling for a polished dark theme interface.
Step 4: Set Up the App Component
Now let's set up the main App.jsx component with the necessary imports and configuration.
Open src/App.jsx and replace its contents with the following initial setup:
import { useState, useEffect } from 'react'
import './App.css'

const BEECEPTOR_ENDPOINT = 'https://react-demo.proxy.beeceptor.com'; // REPLACE THIS WITH YOUR BEECEPTOR ENDPOINT
const BEECEPTOR_PATH = '/api/todos';
const BEECEPTOR_URL = BEECEPTOR_ENDPOINT + BEECEPTOR_PATH;

function App() {
  const [todos, setTodos] = useState([]);
  const [loading, setLoading] = useState(false);
  const [error, setError] = useState(null);

  // We'll add our functions here in the next steps

  return (
    <div className="app-container">
      <header className="app-header">
        <h1>Task Manager</h1>
      </header>

      <main className="todo-card">
        <p>We'll build the UI in the following steps</p>
      </main>
    </div>
  )
}

export default App
Important: Replace react-demo in the BEECEPTOR_ENDPOINT with your actual Beeceptor endpoint name.
This sets up:
- API Configuration: Constants for your Beeceptor endpoint URL
- State Management:
todos: Array to store all tasksnewTodo: String for the new task inputloading: Boolean to track loading stateerror: String to store error messages
- Basic Component Structure: The main layout with header and card
Step 5: Implement Task Fetching
Implement the logic to fetch tasks from the Beeceptor API when the application loads.
Add the fetchTodos function inside your App component (before the return statement):
const fetchTodos = async () => {
  setLoading(true);
  try {
    const response = await fetch(BEECEPTOR_URL);
    if (!response.ok) throw new Error('Failed to fetch todos');

    const text = await response.text();
    let data = [];

    if (text.trim()) {
      try {
        data = JSON.parse(text);
      } catch (e) {
        console.warn("Invalid JSON response, using empty list:", text);
        data = [];
      }
    }

    // Validate that todos have IDs
    const validTodos = Array.isArray(data) ? data.filter(t => t && t.id) : [];

    if (Array.isArray(data) && data.length !== validTodos.length) {
      console.warn(`Filtered out ${data.length - validTodos.length} invalid todos (missing IDs).`);
    }

    setTodos(validTodos);
    setError(null);
  } catch (err) {
    console.error("Error fetching todos:", err);
    if (err.message.includes("Failed to fetch")) {
      setError("Network Error. Could not connect to Beeceptor. Check your internet connection or Beeceptor URL.");
    } else {
      setError("Could not load tasks. Make sure your Beeceptor endpoint is set up correctly.");
    }
    setTodos([]);
  } finally {
    setLoading(false);
  }
};
This function:
- Sets loading state while fetching
- Handles empty responses and invalid JSON gracefully
- Validates that all todos have IDs (required for CRUD operations)
- Provides detailed error messages for debugging
Add the useEffect hook to call fetchTodos when the component mounts:
useEffect(() => {
  fetchTodos();
}, []);
Place this hook right after the state declarations and before the function definitions.
Step 6: Add Task Creation
Adding tasks is usually the first interactive feature in any list-based UI. This is where your frontend starts talking to the Beeceptor CRUD API by sending POST requests. The goal is simple: let users type a task, save it on the server, and instantly see it appear in the list.
First, add state to track the new task input:
const [newTodo, setNewTodo] = useState('');
Create an async function to add a new task with comprehensive error handling:
const addTodo = async (e) => {
  e.preventDefault();

  if (!newTodo.trim()) return;

  const todoItem = {
    text: newTodo,
    completed: false
  };

  try {
    const response = await fetch(BEECEPTOR_URL, {
      method: 'POST',
      headers: { 'Content-Type': 'application/json' },
      body: JSON.stringify(todoItem)
    });

    if (!response.ok) {
      const errorText = await response.text();
      throw new Error(`Failed to add todo: ${response.status} ${errorText}`);
    }

    const savedTodo = await response.json();

    // Validation: Ensure Beeceptor returned an ID
    if (!savedTodo.id) {
      console.error("Server response missing ID:", savedTodo);
      throw new Error("Server didn't return an ID. Please ensure you have DELETED the old Beeceptor rules and created a CRUD Mock rule.");
    }

    setTodos([...todos, savedTodo]);
    setNewTodo('');
    setError(null);
  } catch (err) {
    console.error("Error adding todo:", err);
    if (err.message.includes("Failed to fetch")) {
      setError("Network Error (CORS). The browser blocked the request. This usually happens if the Beeceptor rule doesn't support the method (POST) or is misconfigured.");
    } else {
      setError(err.message || "Failed to save task to server.");
    }
  }
};
This function sends a POST request to create a new task. Beeceptor's CRUD Mock automatically generates a unique ID for the task and returns the complete task object, which you then add to your local state.
The validation check ensures that Beeceptor returns a proper ID, which is critical for subsequent update and delete operations.
<form onSubmit={addTodo} className="todo-form">
  <input
    type="text"
    value={newTodo}
    onChange={(e) => setNewTodo(e.target.value)}
    placeholder="Add a Task"
    className="todo-input"
  />
  <button type="submit" className="add-btn">Add Task</button>
</form>
Step 7: Implement Task Updates
Once tasks exist, users need a quick way to mark them done or reopen them. This is a good point to introduce optimistic updates. The UI reacts right away, and the server call quietly runs in the background. If something breaks, you restore the previous state.
Create an async function to toggle a task's completion status:
const toggleTodo = async (id) => {
  const todo = todos.find(t => t.id === id);
  if (!todo) return;

  const updatedTodo = {
    ...todo,
    completed: !todo.completed
  };

  // Optimistic update - update UI immediately
  const previousTodos = [...todos];
  setTodos(todos.map(t => t.id === id ? updatedTodo : t));

  const url = `${BEECEPTOR_URL}/${id}`;

  try {
    const response = await fetch(url, {
      method: 'PUT',
      headers: { 'Content-Type': 'application/json' },
      body: JSON.stringify(updatedTodo)
    });

    if (!response.ok) {
      const errorText = await response.text();
      throw new Error(`Failed to update todo: ${response.status} ${errorText}`);
    }

    // Consume the successful response
    await response.json();
  } catch (err) {
    console.error("Error updating todo:", err);
    if (err.message && err.message.includes("Failed to fetch")) {
      setError("Network Error (CORS). The browser blocked the PUT request. This often looks like an OPTIONS request failing. Check your Beeceptor CRUD rule.");
    } else {
      setError(err.message || err.toString());
    }
    // Rollback on error
    setTodos(previousTodos);
  }
};
This function improves the user experience by immediately updating the UI state (optimistic update) while the API request processes in the background. If the request fails, it automatically rolls back the change.
Add a checkbox to your task list to trigger this function:
<div className="todo-list">
  {todos.map(todo => (
    <div key={todo.id} className={`todo-item ${todo.completed ? 'completed' : ''}`}>
      <div className="todo-content" onClick={() => toggleTodo(todo.id)}>
        <input
          type="checkbox"
          checked={todo.completed}
          onChange={() => toggleTodo(todo.id)}
          onClick={(e) => e.stopPropagation()}
        />
        <span className="text">{todo.text}</span>
      </div>
    </div>
  ))}
</div>
Step 8: Add Task Deletion
Deleting a task works much like updating one, but the outcome is more visible because an item disappears from the screen. Using the same optimistic style keeps the UI responsive while still relying on the Beeceptor API for the final result.
Create an async function to delete a task:
const deleteTodo = async (id) => {
  // Optimistic update - remove from UI immediately
  const previousTodos = [...todos];
  setTodos(todos.filter(t => t.id !== id));

  const url = `${BEECEPTOR_URL}/${id}`;

  try {
    const response = await fetch(url, {
      method: 'DELETE'
    });

    if (!response.ok) {
      const errorText = await response.text();
      throw new Error(`Failed to delete todo: ${response.status} ${errorText}`);
    }

    // Consume the successful response
    await response.json();
  } catch (err) {
    console.error("Error deleting todo:", err);
    if (err.message && err.message.includes("Failed to fetch")) {
      setError("Network Error (CORS). The browser blocked the DELETE request. Check your Beeceptor CRUD rule.");
    } else {
      setError(err.message || err.toString());
    }
    // Rollback on error
    setTodos(previousTodos);
  }
};
This function also uses optimistic updates, removing the task from the UI immediately and rolling back if the deletion fails on the server.
Add a delete button to each task in your list:
<div className="todo-list">
  {todos.map(todo => (
    <div key={todo.id} className={`todo-item ${todo.completed ? 'completed' : ''}`}>
      <div className="todo-content" onClick={() => toggleTodo(todo.id)}>
        <input
          type="checkbox"
          checked={todo.completed}
          onChange={() => toggleTodo(todo.id)}
          onClick={(e) => e.stopPropagation()}
        />
        <span className="text">{todo.text}</span>
      </div>
      <button
        onClick={() => deleteTodo(todo.id)}
        className="delete-btn"
        aria-label="Delete task"
      >
        ×
      </button>
    </div>
  ))}
</div>
Step 9: Implement Batch Delete
There may be times when users want to clean everything up at once. Since the CRUD API removes items individually, you send multiple delete calls in parallel. This step shows how to coordinate those calls and keep the UI predictable even when some deletions fail.
(Hint: you can use Promise.allSettled to send multiple delete requests in parallel.)
const clearAllTodos = async () => {
  if (!window.confirm("Are you sure you want to clear all tasks? This will delete them one by one.")) return;

  const previousTodos = [...todos];
  setTodos([]); // Optimistic clear

  try {
    // Delete items one by one in parallel
    const results = await Promise.allSettled(previousTodos.map(async (todo) => {
      const url = `${BEECEPTOR_URL}/${todo.id}`;
      const response = await fetch(url, { method: 'DELETE' });
      if (!response.ok) throw new Error(`Failed to delete ${todo.id}`);
      return response.json();
    }));

    // Check for failures
    const failures = results.filter(r => r.status === 'rejected');
    if (failures.length > 0) {
      console.error(`${failures.length} deletions failed`);
      setError(`Failed to delete ${failures.length} task(s). Refreshing...`);
      fetchTodos(); // Re-sync state
    }
  } catch (err) {
    console.error("Error clearing todos:", err);
    setError("Failed to clear tasks on server.");
    fetchTodos();
  }
};
Add a "Clear All" button to your JSX:
<button onClick={clearAllTodos} className="clear-btn">
  Clear All Tasks
</button>
Step 10: Build the Complete UI
Now let's put it all together and build the complete user interface with all the CRUD operations. This also includes adding UI elements to display errors and loading states to provide user feedback.
Replace the return statement in your App component with the following complete JSX:
return (
  <div className="app-container">
    <header className="app-header">
      <h1>Task Manager</h1>
    </header>

    <main className="todo-card">
      <form onSubmit={addTodo} className="todo-form">
        <input
          type="text"
          value={newTodo}
          onChange={(e) => setNewTodo(e.target.value)}
          placeholder="Add a Task"
          className="todo-input"
        />
        <button type="submit" className="add-btn">
          Add Task
        </button>
      </form>

      {error && <div className="error-message">{error}</div>}

      <div className="todo-list">
        {loading && todos.length === 0 ? (
          <div className="loading">Loading tasks...</div>
        ) : todos.length === 0 ? (
          <div className="empty-state">No tasks yet. Add one above!</div>
        ) : (
          <>
            {todos.map(todo => (
              <div key={todo.id} className={`todo-item ${todo.completed ? 'completed' : ''}`}>
                <div className="todo-content" onClick={() => toggleTodo(todo.id)}>
                  <input
                    type="checkbox"
                    checked={todo.completed}
                    onChange={() => toggleTodo(todo.id)}
                    onClick={(e) => e.stopPropagation()}
                  />
                  <span className="text">{todo.text}</span>
                </div>
                <button
                  onClick={() => deleteTodo(todo.id)}
                  className="delete-btn"
                  aria-label="Delete task"
                >
                  ×
                </button>
              </div>
            ))}
            <div className="actions-footer">
              <button onClick={clearAllTodos} className="clear-btn">
                Clear All Tasks
              </button>
            </div>
          </>
        )}
      </div>
    </main>
  </div>
);
Note: This tutorial uses a native HTML checkbox for simplicity. If you want the polished custom checkbox design shown in the demo (with styled
<span className="checkbox"></span>), copy the CSS files from the GitHub repository and replace the checkbox input above with:<span className="checkbox"></span>
This complete UI includes:
- Form: Input field and button to add new tasks
- Error Display: Shows error messages when operations fail
- Loading State: Displays "Loading tasks..." while fetching data
- Empty State: Shows a helpful message when there are no tasks
- Task List: Displays all tasks with native checkboxes and delete buttons
- Clear All Button: Allows users to delete all tasks at once
Step 11: Run and Test
Start the development server and verify CRUD operations:
- Run the following command in your terminal:
npm run dev - Open your browser and navigate to the URL shown in the output (typically
http://localhost:5173).
Test the following operations:
- Create: Add several tasks using the input form. Each task should appear in the list immediately.
- Read: Refresh the page. Your tasks should persist and reload from the Beeceptor API.
- Update: Click the checkbox next to a task to toggle its completion status. The task text should show a strikethrough when completed.
- Delete: Click the delete button next to a task. It should be removed from the list immediately.
- Optimistic Updates: Notice how the UI updates instantly when you toggle or delete tasks, providing a smooth user experience.
Verify Data in Beeceptor
To verify that your data is persisting on the server:
- Open your Beeceptor endpoint dashboard in another browser tab to see requests logged in real-time.
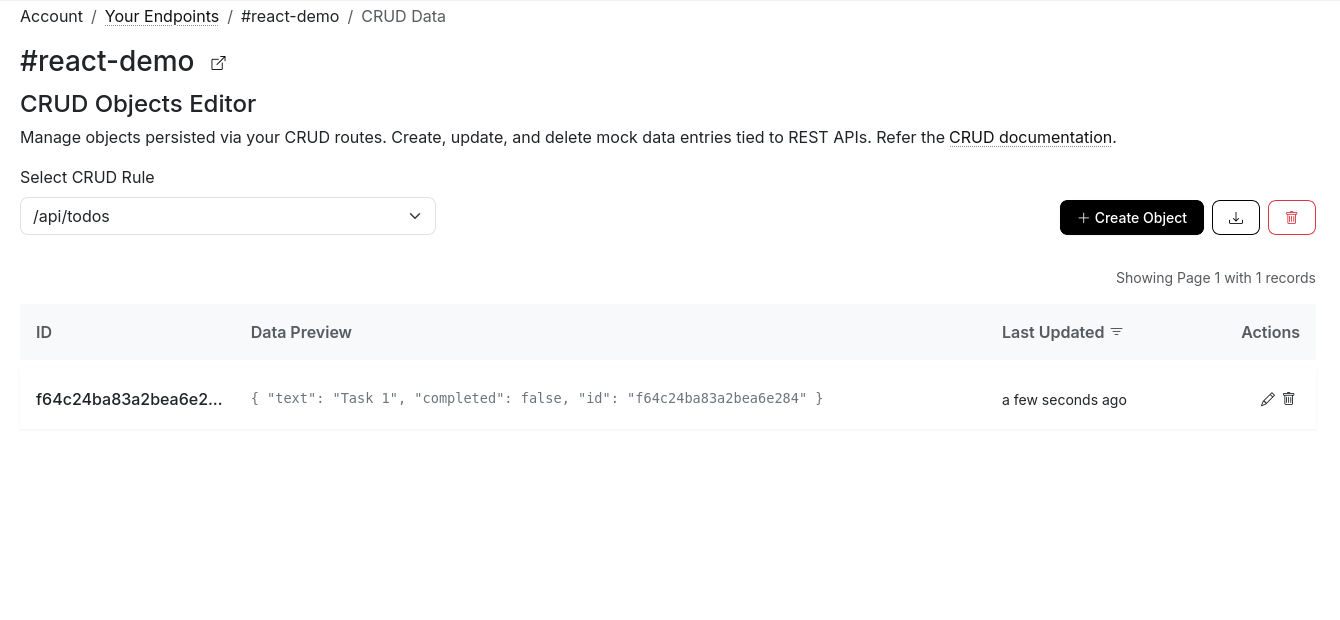
- Click on the "CRUD Data" section in your endpoint settings to view the current state of your tasks.
You can manually add, edit, or delete tasks in this dashboard to see the changes reflected in your React application.
Your Task Manager application is now fully functional with persistent data storage!
Conclusion
At this point, your Task Manager runs fully on a Beeceptor backend. You didn’t write a server, yet you had real API URLs to build with. This lowers friction during UI development and keeps you productive while the backend work is still underway.
To extend your application further, consider adding:
- Task Editing: Allow users to modify existing tasks.
- Filtering & Search: Add controls to view active/completed tasks or search by text.
- Enhanced Metadata: Add due dates or priority levels.
- Beeceptor Features: Experiment with response delays or error simulation to test your app's resilience.